Showing posts with label Disney. Show all posts

Disney Album Journal Page

Disney layout
Do you journal on your layouts? I try to journal on pretty much every page. I scrapbook to tell a story - one I hope my kids will be interested in reading someday. Because they sure as hell aren't interested right now I can tell you. But I digress. Anyway,,, I normally have a couple of pages where I don't have photos in a mini album- and I like to use that space to add some thoughts that are separate from photos. For instance this page- my DD1, her husband, and my sweet princess all left a day earlier than my husband and I. I was so sad to see them go!

This post may contain affiliate links. Please see my Disclosure
This month the Rinea® design team is collaborating with Poppystamps. Y'all, they have some uber cute stamps and dies. I choose to work with the 2002 Double Stitch Scalloped Rectangle Frame set. Since I make waaaayyyy more traditional layouts than cards I wanted something that I could use there too. These make great photo frames!


Rinea Foiled Paper
Rinea® Foiled Papers is launching a new color this month; Arctic/Gold Glossy Foiled Paper. It is a crisp white and I love it. I have used it here as a border and I punched it with an older Martha Stewart punch. I added a thin strip Ruby/Gold Glossy Foiled Paper on top of the Arctic.  I also added an outline around the punched shape with a thin line black pen. (Stabilo is my favorite!) I do this a lot on small embellishments; it helps them stand out from the page and adds some visual weight.


Rub on embellishments

 OK - I keep embellishments forever. Like I almost won't throw them away. I will toss scrap paper right in the trash, but embellishments are here to stay. These Disney themed rub-ons are from Creative Imaginations. From like 2005? Seriously, it's been a minute.

Die cut frame
 I used the second to smallest die from the set to cut this cute little frame. It is the perfect size to go with a die cut embellishment I wanted to use. I inked both the frame and the die cut using VersaMagic Brick Red ink and adhered to the page.

Mickey ears

Look how cute this little chipboard piece is!! I picked this up at a scrapbook show a couple of years ago; it is a set from Melissa Frances. It was perfect to go around another rub-on and I love how it peeks from the top of the page when the album is closed.

Be sure to check out Rinea® and Poppystamps 
websites for some great ideas. 


Hogwarts Album Pages in progress

Embellishment storage
I am still moving along in my Disney mini album from our trip in 2018. I am up to day #6 of our nine day trip - Hogwarts album pages in progress - so I am nearing the end!! Yeah! Day #6 was spent at Universal Studios - which meant that my DD2 had a great time. She is a huge Harry Potter fan. 

Disclosure:  This blog uses affiliate links.  If you choose to make a purchase using one of the links, I receive a small commission (at no additional cost to you) that helps offset the costs of maintaining this blog.


Hogwarts in progress
I make a fair amount of Disney Albums and I have collected a ton of stuff to use for them. When I am working on an album it drives me crazy to have to dig through my embellishments to find what I am looking for. Enter the amazing Deflecto Stackable Cube Organizer. By removing the drawers and turning it up on the end it becomes a great way to store all my stuff within reach. It keeps everything in place and I can flip through the my pieces to grab the perfect embellishment. 


Disney Album
Since I am cutting papers to a 6x8 size I have LOTS of extra 6" wide pieces of patterned paper. They were driving me nuts in a stack on my work space. I grabbed a Medium Stackable Caddy Organizer Container and it is perfect for holding all those smaller pieces of paper in check!


Disney punches
Two more pages finished, Hogwarts and Seuss Landing are done and in the book. I am using a Simple Stories 6x8 album for this project. I love that size for trip albums. Next up is the Mickey's Very Merry Christmas Party which was a blast!


“This is a sponsored post. As a member of the Deflecto Design Team I have been provided product in exchange for my creative ideas, views and opinions.”


Meeting Disney Characters Mini ALbum Layout

Disney Characters
I am still plugging away at my mini album from out family vacation to Disney last year. I have put it away several times due to being busy with other things, but I am hoping to finish it up in the next month. I am half way there! My DD2 loved meeting all the characters at Disney - totally her favorite part. The first thing she did when we walked in was grab a character to hug!  This layout is the 2nd day of our vacation.

I used:
Paper punches
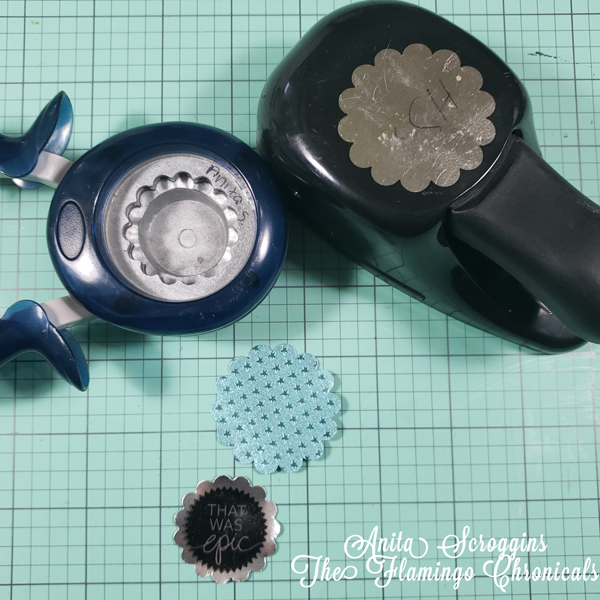
I stamped my sentiment on the Silver/Gold Glossy Foiled Paper, let it dry, then punched with a scallop circle punch. I punched a larger circle using the Turquoise Starstruck Foiled paper.
Use Gossy Accents to adhere them together.

Embossing folders
I ran a piece of the Turquoise/Gold Glossy Foiled paper through my die cut machine using an embossing folder then cut a narrow strip just one circle wide. Use Glossy Accents to adhere to your page.

Layered punches
Here's the final result- lots of texture but still very flat. Which is important when I am trying to squeeze 9 days of vacation into one small SNAP Album!

Check out all the amazing things you can do with Rinea Foiled Papers over on the blog


Magical Memories Class

I am so excited about the new class I am doing at The Crafty Scrapper. I had so much fun creating this class and you will love this little book to hold all your Magical Memories. I have used the uber cute Say Cheese I and Say Cheese II paper lines from Simple Stories.


 I started with  Maya Road Oh Snap bare chipboard album and added tons of media to make it my own. Because I can never make anything that is flat I added some Filmstrip tape from Tim Holtz for depth and dimension. I LOVE the way this turned out!


Because I like to have lots of dimension in my books I added several die cuts made from Eileen Hulls mat board and dies from Sizzix.

Coin envelopes are the perfect way to add pockets to your mini albums!

I don't normally use a lot of stickers for my albums, but I adored the 12x12 sticker sheet with this line. Sooooo very cute!!

We all know how much I love my Cinch from We R Memory Keepers. I used it here to bind the album and to add some additional pages to the other side. This album measures an impressive 20+ inches when it is fully open!


There are LOTS of ribbons included in the class kit as well, I just photographed the book before I added them for some strange reason :(
We have had this class once, and it is on the schedule again for July 26th. There are also kits available if you are unable to make the class in person. Contact the store directly at 972- 923-3151 to reserve your spot in class or purchase a kit.

Thanks so much for stopping by today! 


Magical Memories Mini Album

Hi everyone! I have a new class coming up over at The Crafty Scrapper that I wanted to share with you. I am pretty excited about this class- it is going to be so much fun!

MAgical Memories Album Cover

Do you have some magical memories to record? This album is the perfect solution! We will start with the Say Cheese papers and a Maya Road chipboard album as the base, but will add additional pages and lots of extra media to create an amazing one of a kind book. Using the Cinch binding tool allows us to create an album that opens on BOTH sides and measures an impressive 20" wide when fully open!

If you have been wanting to learn to use the Cinch binding tool, or would like some more practice with it, in this class you will learn how to make your albums really interactive and personal.
I recommend Scotch Quick Dry Adhesive for covering the chipboard base of the album. If you have never used it I will be showing the method I use. Also bring a Tiny Attacher, Bone folder, black journal pen, white Signo pen, LOTs of foam tape/pop dots, and the basic class kit found on our home page.

Anita Magical Memories Open

Anita MAgical Memories top

To reserve your spot in the class, be sure to call the store 972-923-3121. 
Remember, if you are not in the area, you can purchase a kit just by calling the store :) Kits will be available next month (we are waiting on the paper to ship).