Showing posts with label Punches. Show all posts

Spring Banner- Home Decor

Hi everyone, I am guest blogging over on Craft Paper Scissors, be sure to stop by and check out all the amazing projects!  I love Spring! It is my favorite time of year. Everything is coming alive in the yard, the birds are singing, the flowers are blooming and the world is happy. I like for my decor in the house to reflect those same feelings so cheery and full of color is the name of the game.

This year a created a new banner using laser cut wood pieces, cardstock, colorful flowers, and lots and lots of fun ribbon!


I found these wood cutouts at a popular chain craft store last month and I knew that I had to make a banner with them- they just yelled SPRING at me from the shelf. I started by covering the wood with two layers of VersaMagic ink in Pink Petunia, glueing them to cardstock when dry.


I pulled out my trusty decorative edge scissors and trimmed around the edges of the shapes- no measuring, I just eyeballed it. Then the real fun began! I pulled lots of spring colored flowers from my stash (have you seen my Prima Breeding Program?) and started layering them together. For the section on the right above, I punched three pieces of patterned cardstock in staggered sizes, shaped them, layered them together using foam tape, then added that onto a larger daisy. Easy peasy- super fun flower!


For the flower on the left I used vintage crepe paper and an XXL Glue Dot to create the back section, then adhered a ruffled flower in the center to complete the look. I have several tutorials on making your own flowers here.

For the section on the left I made a ruffled flower using Italian Crepe Paper, using a Maya Road trinket as the center, then adhered it into a hoarded vintage Martha Stewart paper flower (shown in the previous photo on the right). For the right section, I layered 7-8 hoarded vintage Prima flowers, using my Tiny Attacher to secure them in the center. These are the nice, big ones they used to make that came in the cans that are about 4" across. I really miss those!

 Something I do every time I make a banner is group lots of ribbons between each section. I just love the way this looks. I picked up this technique years and years ago in a class, so long ago I don't even remember what the class was about or for! The process is simple- grab a bunch of different ribbons, clip them to about 4" and lay them on your work surface. Take one ribbon and clip it a little longer- about 6" and use this one to tie all the others into a bunch, using a sturdy knot. Then tie that onto whatever string you have going from section to section. Easy peasy.

Thanks so much for stopping by today!

Halloween Fun with Sparkle N Sprinkle

Hello everyone! I hope you are enjoying your long weekend.

Today I have another layout to share with you for Sparkle N Sprinkle
using some fun new Halloween Stamps.
I have very few Halloween photos of my little ones, so the ones I do have are so precious to me! They were 3 and 5 here. I have used the new Authentique papers for this layout and I love that little border of witches that I used right behind my photo!

For my title I have used Camera Life and heat embossed it with Concord Star.

I used the Witches Brew stamp set and the same EP for my sentiment. I used Clementine EP on the middle layer of my die cuts. To add a little sparkle to my border I used Purple Rain GL and 1/8" Tear-ific Tape. For the double layered hexagons, I applied 2 1/2" Tear-ific Tape to my paper, punched it out, burnished with Cloud Nine GL, and adhered with foam tape.

For my border I did some punching, layering and sewing with my machine.

I used Flourishes 2 in the corner and heat embossed with Detail Black EP.  I added a spritz of silver spray ink.


To see all the details and products used, hop over to

Thanks so much for stopping by today!

Anita


Deconstructed Layout #15 Timeless Memories


Timeless memories

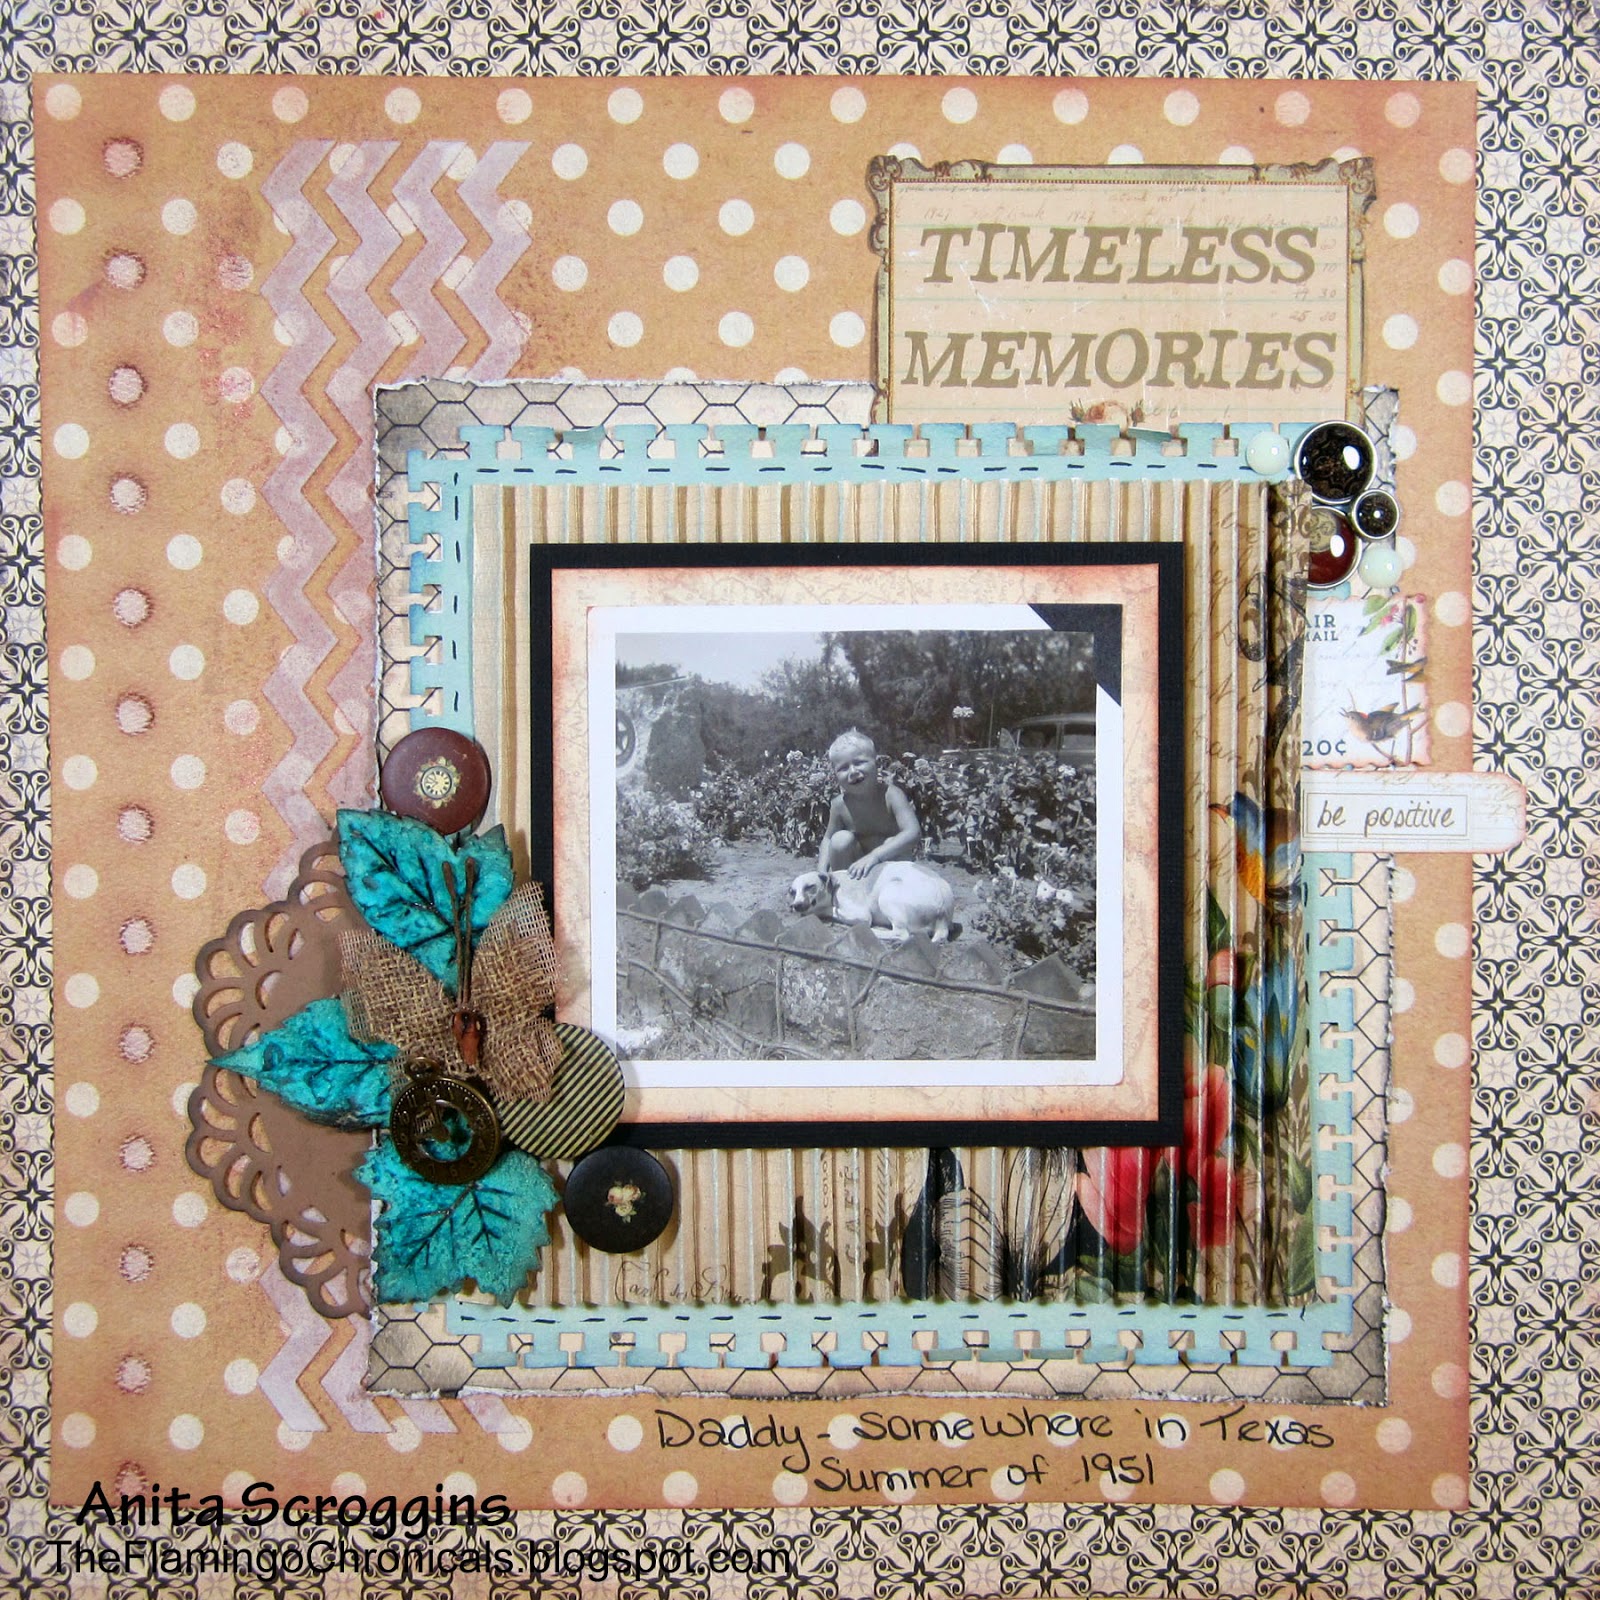
Hi everyone, I'm here today to share a new Deconstructed Layout with you. Today's tutorial is on paper pleating, which is a great way to add some dimension and texture to your layout using just a plain piece of paper! I have had this photo of my dad for some time, but wasn't sure how I wanted to scrap it.Since it is a black and white photo, I didn't want to overwhelm the photo so the colors of these Authentique papers were great.


To see all the tutorials in the Deconstructed Layout serious check them out here.

paper scoring
I wanted to use this paper, with these accent colors, but I didn't want the pattern on the paper to show. I decided to pleat the paper to distort the pattern.

paper pleating
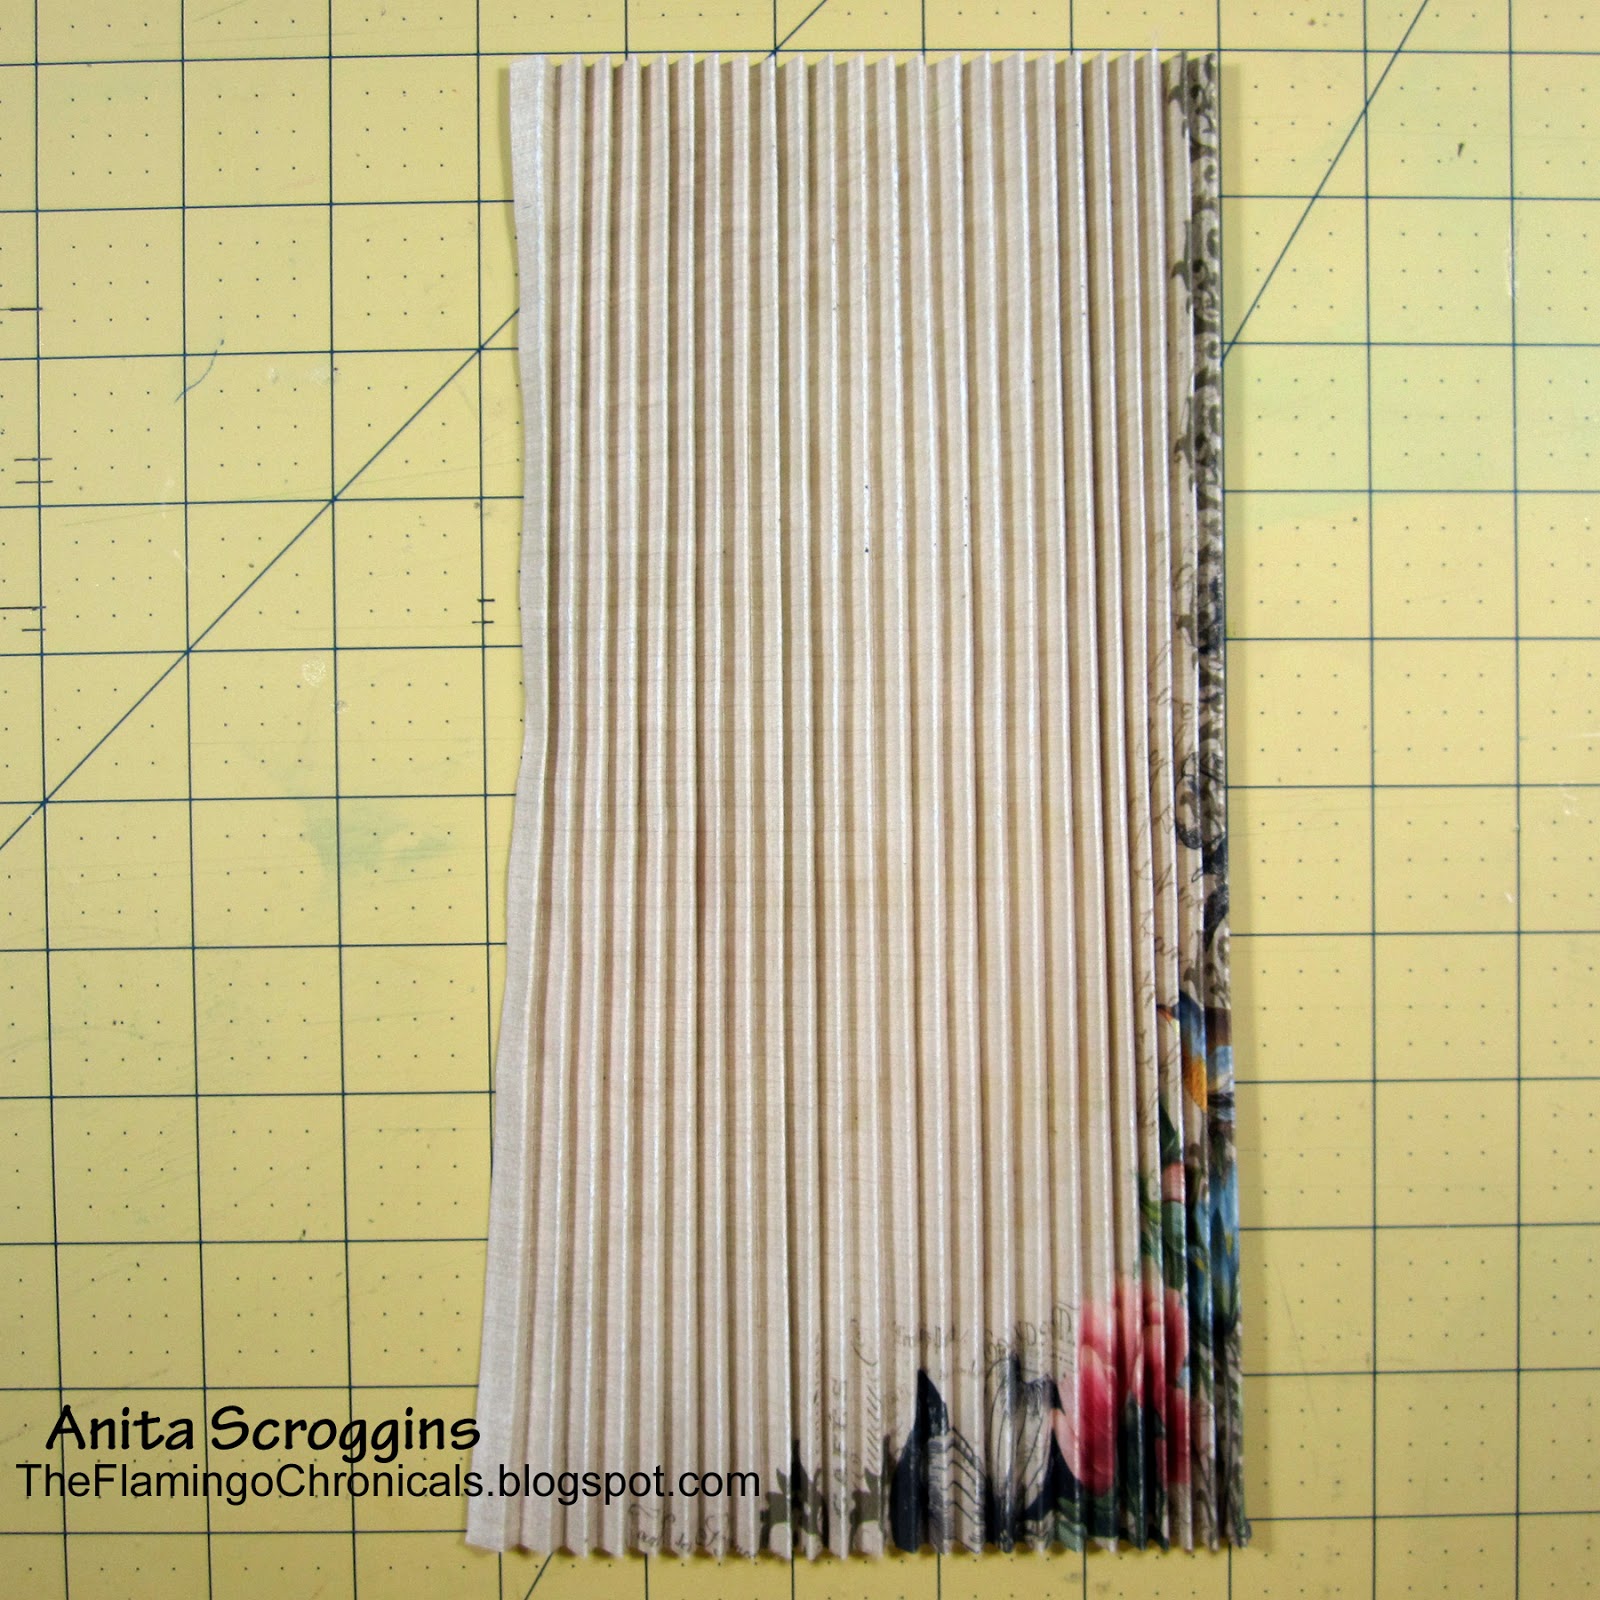
I scored the paper every 1/2", then flipped it over and scored on the 1/4" intervals between the first score marks. So the paper ended up being scored every 1/4", with every other score mark alternating front and back.  Now the fun really begins!

pleated paper
Accordion fold the paper until it is pleated all the way across.
(This is time consuming and takes some practice, I admit. I recommend that you start with some fairly thin paper and make the score marks further apart, maybe every 1/2" instead of every 1/4" to practice. Once you get a feel for it, then work on the paper you want to use on your layout.)

making a photo mat
You will need something extra strong to hold the pleated paper down, so I used Tear-ific Tape from Sparkle N Sprinkle. Any very strong double sided tape will work. 

vintage photo
I adhered the pleated paper onto several other layers of paper, then matted my photo and adhere it on top using more double sided tape. 

chipboard cluster
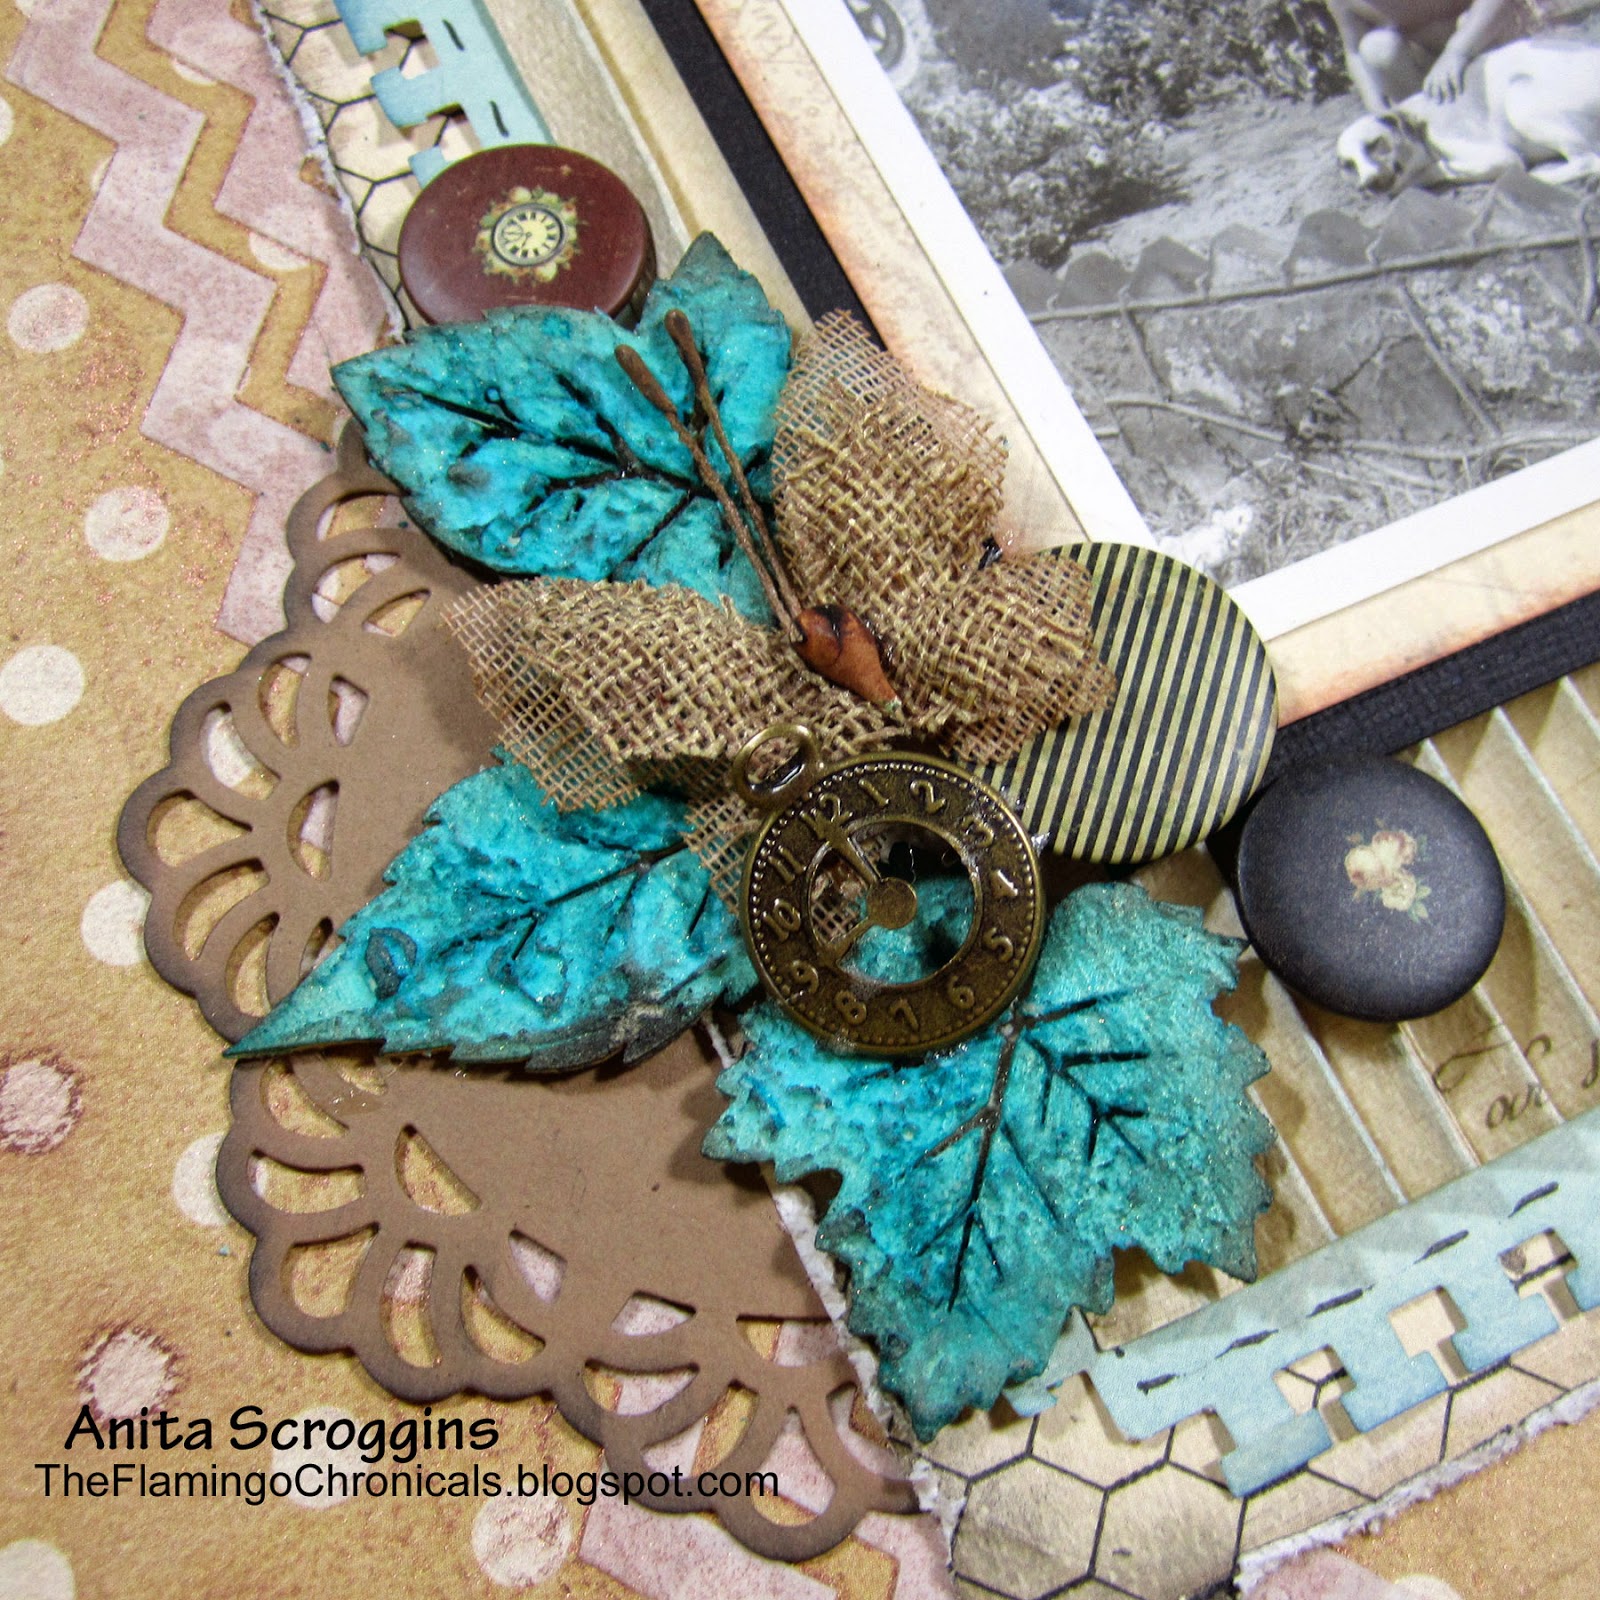
I used a variety of embellishments for my cluster. To color the wood leaves from Prima, I first covered with a layer of Molding Paste, using my paint brush to give it some texture. Once it was dry I used Time Travel Teal from Lindy's Stamp Gang Industrial Chic Magicals Set to color them. 

I hope you give this technique a try! It takes a little practice, but it is a great tool to have in your bag once you get the hang of it.


Sparkle N Sprinkle September Reveal


Welcome to Sparkle N Sprinkle's September 1 Reveal.


This month SIX new stamp sets are being introduced.   These sets are 20% off their regular price, until September 3rd.  All the new reveal sets are available on Cling Mounted Rubber and as a digital image. The Magic of the Season, set #653 is the stamp set featured in  This Month's Technique Video.


The sets are:


Autumn Splendor #651   (Digi version - DIGI651)

Farm Sweet Farm #652  (Digi version - DIGI652)

Magic of the Season #653  (Digi version - DIGI653)

Thanksgiving Friends #656  (Digi version - DIGI656)

Bountiful Blessings #658  (Digi version - DIGI658)

Sweet Holiday #655  (Digi version - DIGI659)


I have use the Magic of the Season stamp set for my layout this month

I used the swirly portion of the hat stamp to stamp all around the edge of my page, then I heat embossed with Silver Detail EP.

I also used the new Wonky Plaid Background to stamp a boarder across the center of my page. I applied
 Tear-ific Tape to cardstock and cut the title using my Cameo machine; I burnished it with Gypsy Red GL.

I heat embossed the Want2Scrap Chippies with Cappuccino EP.

I added a bit more sparkle using Tear-ific Tape and Silver Dreams GL.

To see all the details including a full supply list, please check out
my gallery at Sparkle N Sprinkle.


On Sept 3rd,  one Grand Prize Winner will be selected from the comments left on the designers' blogs listed below.  The Grand Prize Winner will receive their choice of:


1) all SIX of the new rubber stamp sets

or 

2) all the new digital stamps and digital stamp sets. 


The new SNS Creative Challenges also begins today, with lots of prizes and recognition badges. 


The winner of the blog hop will be announced on Sept 3 on Facebook, the SNS blog, and on our blogs:


(Tip: if you have a problem with a particular link, try clicking on the person's blog title to send you to their Home page.)


Don't forget to leave a comment with each Designer to be eligible for the Grand Prize.  We love reading your comments and hope we have inspired you as well.  If you absolutely can not leave a comment for some reason, please email icinganne@yahoo.com with your comment and the name of the blog or Designer you are commenting about.

We hope you enjoy the New Reveals as much as we do!
Wonder which Designer contains the Grand Prize this month?


Thank you so much for stopping by today!
I hope you have had an amazing holiday weekend with family and friends. 

Anita


Deconstructed Layout #12 Newborn Photo


Newborn Photo
For the Deconstructed Layout #12 - Newborn Photo - I want to talk about using a LOT of the same color, without overwhelming your layout with it. You CAN do it! The secret is to layer the color same color with a neutral to help break it up.

To see the entire Deconstructed Layout series be sure to check this page.


Punched paper
This is my second layer from the bottom, and I love the pattern, but wanted more color. So after I punched the edges, I inked it- and I mean I really inked it! The ink extends about 2- 2.5" in from the edge.I started with the lightest color of ink I wanted to use, then added a darker color of ink just along the edge of the paper. 

Heat embossing
Next up, I used my VersaMark  around one side at a time, and added a bit of texture with Lindy's Stamp Gang Hibiscus Rose Orange Embossing Powder. 

embossed chipboard
I also used Lindy's on my Blue Fern Studio's Chippie- this time Golden Angel Wings. You can see on the upper layer of paper, just under the chipboard, I stamped using the Heart Flourish Splash stamp and an ink one shade darker.  I added the small burlap flowers to the centers of a couple of larger flowers for the corners.

Burlap flowers
 I added more flowers, butterfly, and a brad to the lower corner. I also added some faux stitching with my Signo White pen. 

layers of color
This photo illustrates how I wanted to use my color how it all came together. For the most part my layout is a monotone, mainly PINK. However, I separated each layer of pink with a NEUTRAL.

Starting from the corner there is;
1. The background page
2. the PINK punched page
3. the neutral flower die-cut and chipboard
4. the PINK edge of the punched paper
5. the white portion of the punched paper
6. the PINK cardstock
7. the photo
So, the moral of our story is this:
if you want to use one color in abundance, be sure to place it between layers of neutral colors
and it will be fabulous!


I hope you give this a try, and I would love to see how it turns out!


Girls Night Out for Sparkle N Sprinkle

Happy Sunday everyone!
Today I have a project to share using fabulous stamps and glitter from

Sparkle N Sprinkle

 Although I have a very large circle of friends, I have a small circle that are my closest friends that I would call in the middle of the night if I ever need anything. We have been friends forever and have been through it all together. We make sure we get together without kids and husbands every few months to have a fun time together!

One of our favorite things is going to the theater! For this layout I used a variety of Sparkle N Sprinkle's fabulous background stamps. I love the Journal Mixed Media set- it is so versatile, I swear you can use it on any layout! Here I have stamped it randomly across my background page using Powder Puff ink from Quick Quotes. On top of that I have added the Leafy Flourish Stamp right where I was going to place my photo.

My sentiment is from the Old Friends set- I love this saying, so apt! I added a bit of sparkle using 1/8" Tear-ific Tape and Priceless Peacock on my punched cardstock. To add some definition to my die-cut elements, I either traced around them or added faux stitching with a fine black journal pen. If you have never tried this, it is an amazingly simple way to add detail to your layout or card!


Here is a better look at the stamps I used to create my background. I also added a bit of doodling around my photo to ground it to my layout. A few brads and flowers and my layout was done.

I am linking up at the following challenges:
Quick Quotes - repeating shapes- I used circles (brads)
 Feeling Sketchy- sketch!


To see all the details on my layout, including all the products used, please see My Gallery at Sparkle N Sprinkle.

Thanks for stopping by today!
Anita

Girl Scout Adventures- ColourQ #238

Hello to all my blogging friends!
I am so loving this spring weather we have right now in 
Dallas- It is only going to last another day or so though. Boo!~

Today I have a project to share using the new Palette at ColourQ

I have to admit I struggled with these colors, even though I like all of them 
except for Elegant Eggplant- I am just not a purple kinda girl!

Here is a look at my project
I made a double page layout this time around, as I had several photos I wanted to use.
Of course- these photos are way back in the day before we all had digital,
so they are the prints I have from my old 33mm!

I have used Kraft paper, Bazzill CS, and I even broke out some of my stash
of Daisy D's paper- I just love that yellow! 

My chippie is Dusty Attic and I have heat embossed it. 
I used a MS punch on the edge of my cardstock.

Sorry about the fuzzy pic- my lens are I were just not on the same page today!
The little tiny flowers are from Iam Roses- and I inked them eggplant.

I used two different punches on the white cardstock, then used an embossing
folder on just the corners for some texture.  I inked the raised bit to make it stand out. 

Of course, I have added my journaling- remember adding your own handwriting to
your pages is so important! If you want to know why- see this blog post

Be sure to link up over at the ColourQ Blog- you have until
next Monday to play along. 

Thanks for stopping by today!
Have a wonderful week!

My Favorite Things Blog Hop with Frosted Designs

Hello crafty friends and welcome to the Frosted Designs "Favorite Things" Blog Hop!!! As most of you know, March is National Craft Month!!!  What better way to celebrate our favorite time of year than with a "favorite things" blog hop?!?  We are so excited about all the fabulous items in store that we wanted to share with you how we use them on our projects!  Our Design Team has put together some AMAZING projects just for your viewing pleasure :-)

If you've arrived here from Debbie's blog, then you're in the right place!  If not, please start the hop at the Frosted Designs Blog here!

As you hop along, be sure to visit each Design Team Member's blog for wonderful inspiration and creative ideas on how we use our favorite products!!! While you're there, be sure to leave them some love!!!  Each member will have a "scrambled" word in their post... (*HINT* The word will be a Frosted Designs Product!!!).   Unscramble each one from the line-up below and send them to Brandimatos@gmail.com!   After you've completed your "hopping", come back to the Frosted Designs blog and tell us how much fun you had!!
Now, what would a blog hop be without some AWESOME prizes?!?  By sending in your "unscrambled FD products to Brandimatos@gmail.com, you will be entered into a drawing for the following prizes:
Creative Embellishments is offering a $20.00 Gift Certificate to their store full of detailed chipboard pieces and rubber stamps!!! 
AND
Regina, from The Cutting Cafe, is also sponsoring THREE full sets of your choosing to her online store!!!!  It's FULL of cut files and digi stamps for EVERY occassion!!! 
AND
Barb is also offering a $20.00 Gift Certificate to the Frosted Designs Online Store!!!  All you have to do is fill out the Rafflecopter on the Frosted Designs Blog to be entered into the drawing!!!!


I also have some blog candy to give away-- be sure to go all the way to the bottom of the post!


So here is a look at my layout,,,

I have used FabScraps papers from the Frosted Designs Store, along with
some odds and ends from previous kits. 
I added a fabulous chippie from Blue Fern Studios, some ribbon,
a doily, and a little bit of bling. 

I used my Silhouette Cameo to cut this little bit of paper lace behind my photo. 
I sprayed it lightly with Dylusions.

I cut my title and accent with my Cameo too.
 The little stars here are from UmWow
Studios. I added some punched strips of paper to give my layout some
dimension.

I am totally in love with the Lindy Stamp Gang Magicals Powders!!
I started by covering my chippie in a heavy layer of Gesso, and when it was
dry I layered several colors of blue Magicals on it. To get the really bold look
for some of the colors, I tapped the powder on with my finger and then misted with water.

I used my Signo Uniball White Pen (which is hands down one of my 
all time favorite items) to add accents to the dry chippie - which
 is from Blue Fern Studios by the way.

Here is my SCRAMBLED WORD
 TONBCAAI OOLBMS 
(HINT* It's located under "flowers" in the FD Store here


In addition to the great prizes offered on the main blog,
I have some candy up for grabs too!


How do you get a chance to win?
#1 -  Follow me here my blog.
#2 - Hop over to my Facebook Page and give me a Like and leave me a comment
Easy Peasy! 
I will draw a winner on Monday the 24th. 


As usual, there are some housekeeping rules:
1.  Visit all the blogs and leave a comment so we know you were there!  Not to mention, you don't want to miss all the wonderful inspiration along the way :-)
2.  Before you leave each blog, look for the "secret" word and write it down.  Once you have visited each blog, you should have a complete quote!
3. Finally, come back to the Frosted Designs Blog and tell us how much fun you had!!!  Email your completed quote to Brandimatos@gmail.com!
4.  HAVE FUN!!!!  After all, that's what this is all about :-)
Here is the Blog Line-Up in case you get lost:

Thanks so much for hopping by today!
Have an amazing weekend!

Anita