Showing posts with label Spring. Show all posts

Sublimation Wine Stopper DIY - Easy and Fun


Sublimation Stamp Pads Wine Stopper

Now that Christmas is behind us my thoughts are turning to spring and all the fun crafts that brings. Valentine Day is not a huge deal for us, because our wedding anniversary is that same week. But, I still like to mark the occasion - and wine is a must! 


This month the Wine Stopper is the Blank of The Month at Artesprix and it is adorable y'all. You really need to grab one - or a couple - before they are gone. They are HEAVY too - much more than I expected. AND- they each come with 4 sublimation ready gloss white inserts - so you can change them up if you wanted to!


Artesprix Wine Stopper Sublimation

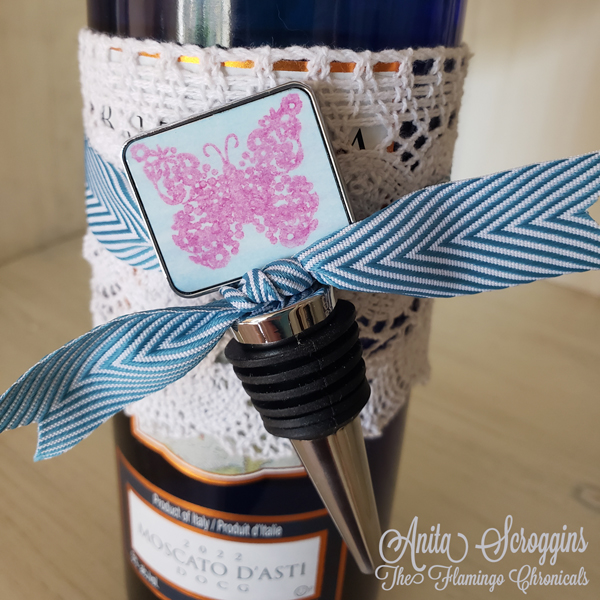
I grabbed a bottle of wine - Moscato is my favorite - added some lace to dress it up, and tied a matching ribbon to hold the wine stopper in place.  

Supplies:

Artesprix Wine Stopper 

Artesprix Sublimation Stamp Pad - I used Pink

Artesprix Sublimation Marker pack

Artesprix Heat Tape

Artesprix Protective Paper

Heat press - I like this one. It is easy to travel with and doesn't take up a ton of space!

Copy Paper

Pencil

Scissors

Stamps and stamping block

Sublimation Step by Step

Step 1 : trace the blank onto copy paper using a pencil. Never a pen! Pencil will not transfer onto the blank, but a pen will.

Step 2 : stamp your design on the copy paper using clear acrylic stamp and Sublimation Ink Pad. Remember- the color of the ink changes dramatically when it is heated!

Step 3 : I used a marker and colored over the stamped image to fill the entire outlined space. 

Step 4 : place the blank face down onto the design and secure with heat resistant tape. NOTE: this blank has a protective top sheet that must be removed prior to pressing. Don't be like me and forget that step the first time!

Step 5 : (not shown) make a "sandwich" with the protective paper enclosing the blank inside, with the copy paper UP. 

Heat press - for the wine stopper it is 385° for 45 seconds. Carefully remove from protective paper and peel one side of the copy paper back to make sure everything looks great before removing it completely. 

Ta-da! You have a beautiful sublimated blank. Add to the actual wine stopper using the double sided adhesive already in place, just remove the paper covering and press the sublimated blank into place. 

DIY Sublimation Wine Stopper

 Look how adorable this is! Everyone on your list is going to love getting one of these.


Spring Banner- Home Decor

Hi everyone, I am guest blogging over on Craft Paper Scissors, be sure to stop by and check out all the amazing projects!  I love Spring! It is my favorite time of year. Everything is coming alive in the yard, the birds are singing, the flowers are blooming and the world is happy. I like for my decor in the house to reflect those same feelings so cheery and full of color is the name of the game.

This year a created a new banner using laser cut wood pieces, cardstock, colorful flowers, and lots and lots of fun ribbon!


I found these wood cutouts at a popular chain craft store last month and I knew that I had to make a banner with them- they just yelled SPRING at me from the shelf. I started by covering the wood with two layers of VersaMagic ink in Pink Petunia, glueing them to cardstock when dry.


I pulled out my trusty decorative edge scissors and trimmed around the edges of the shapes- no measuring, I just eyeballed it. Then the real fun began! I pulled lots of spring colored flowers from my stash (have you seen my Prima Breeding Program?) and started layering them together. For the section on the right above, I punched three pieces of patterned cardstock in staggered sizes, shaped them, layered them together using foam tape, then added that onto a larger daisy. Easy peasy- super fun flower!


For the flower on the left I used vintage crepe paper and an XXL Glue Dot to create the back section, then adhered a ruffled flower in the center to complete the look. I have several tutorials on making your own flowers here.

For the section on the left I made a ruffled flower using Italian Crepe Paper, using a Maya Road trinket as the center, then adhered it into a hoarded vintage Martha Stewart paper flower (shown in the previous photo on the right). For the right section, I layered 7-8 hoarded vintage Prima flowers, using my Tiny Attacher to secure them in the center. These are the nice, big ones they used to make that came in the cans that are about 4" across. I really miss those!

 Something I do every time I make a banner is group lots of ribbons between each section. I just love the way this looks. I picked up this technique years and years ago in a class, so long ago I don't even remember what the class was about or for! The process is simple- grab a bunch of different ribbons, clip them to about 4" and lay them on your work surface. Take one ribbon and clip it a little longer- about 6" and use this one to tie all the others into a bunch, using a sturdy knot. Then tie that onto whatever string you have going from section to section. Easy peasy.

Thanks so much for stopping by today!

Easter Bunny Centerpiece with Smoothfoam

Howdy folks, today I want to share a home decor project using Smoothfoam.  Valentine Day is past, so that means it is time to decorate for Easter. I love Easter decor- it is just so cute!My DD1 loves Peeps so I just had to make this for her.

Supplies:
Smoothfoam 8"x1" Disc
Smoothfoam 6"x1" Disc
Smoothfoam 1"x6"x12" Sheet
Smoothfoam 2"x4"x4" Block (4)
Hot Knife Tool, toothpicks
Acrylic Paint and brushes, circle punch
Floral Moss, Ribbon, Black Cardstock,
Paper Flowers, Decorative Eggs,
Container

1. Using 6" disc as a pattern, cut a portion of the 8" Disc so that the 6" disc will  fit snug against it.
2. Draw pattern for ears and trace onto 1x6x12 sheet, cut out the shapes, and smooth the edges a bit for a more rounded look.
3. Attach the pieces together using toothpicks. Paint front and back with acrylic paint and set aside to dry. Add punched circles for eyes and nose. Tie bow around neck. Insert sharpened dowels into bottom of bunny and anchor in your desired container.


I have this wonderful rustic wooden piece that I normally use for silverware, and it turns out that the 2x4x4 Block fits perfectly into the sections! I covered them with moss and inserted the bunny into the front sections.

I decorated the box with some paper flowers, and some decorated eggs.

I made these eggs which I am absolutely in love with to go at the base. To see the details on these, please see my blog post HERE.


Thanks so much for stopping by today. What are you crafting up for Easter? I would love to see what everyone else is up to, so leave your links in the comments below so I can check it out!