Showing posts with label StyleTechCraft™. Show all posts

Fun Camping Helpers using StyleTechCraft Adhesive Vinyl


Camp Food

We love to go camping and I am always on the look out for ways to make camping less work and more fun. Especially when you are camping with kids- you need all the tricks! I picked up a few things to help out and of course I had to decorate them! I hope you like these fun camping helpers! 


Trailer Trash

First up is this small trash can I grabbed at the Dollar Tree. It is always a chore trying to keep trash in hand while cooking! I have tried a few things over the years and a weighted trash can on the table is the one I like the best. Now, we don't have a camper - yet- but we are actively looking at them! I can't wait to be able to travel with my hound again! 


Craft Vinyl

This plate cover also came from the Dollar Tree, and I picked up a couple of them. I created a cute file in Silhouette Studio using Text to Path. I applied to the top of the plate covers. TIP: it is much harder to apply vinyl to a soft surface with nothing behind it! 


Shoo Fly

How unbelievably cute is this! I can't wait to use them when we go camping later this month. 

Camp Chair

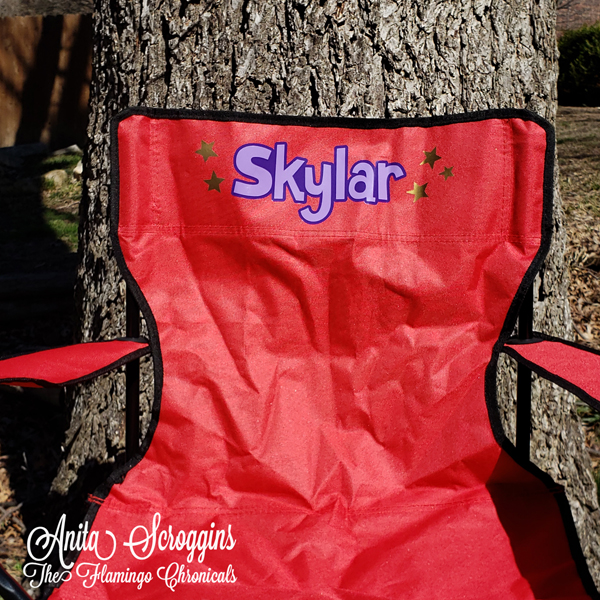
Of course my sweet princess needs a personalized camp chair! I used Glossy Craft Vinyl to create a two layer design and added some stars. I hope she loves it!

I used the following to create these projects:

Craft Vinyl 
  • White #492
  • Black #499
  • Lavender #434
  • Purple #439
  • Light Pink 
  • Tiff Blue #487
  • Gold #485

Ultra Metallic Silver #126

Be sure to check out the StyleTech Craft­™ Facebook page for great ideas and updates on new colors!


Mod Podge Easter Tray


Mod Podge Easter Tray

This year I am determined to get more Easter decor up around the house. Last year I created my Easter Tree (check it out here) and this year I want to add a few smaller pieces around the house. My sweet princess loves to find new things when she comes over. I think she is going to love this Easter Tray that I created using Paper Mod Podge.


PAper Mod Podge

I picked up this tray at HL a while back and have been wanting to use napkins and Mod Podge to create something fun with it. I found some super cute bunny napkins and couldn't wait to get started!  Did you know that Mod Podge has brushes designed to use with their products? I love using these because I don't have to fight with brush marks!

Fussy Cut Napkins

Start by fussy cutting the napkins. These napkins were pretty thick so I used my favorite paper scissors. Be sure to cut enough to finish your project and a couple of extra. Once the layers are separated they are thin! Pull the layers apart so that you are left with the top layer only.


Mod Podge Napkins

I like to start in the middle of the piece and apply one piece at a time. I did find that it was easier to apply a thin layer of the Mod Podge, then press the napkin into it, and let that dry. Then I went back and applied a layer on top of the napkins. When I tried to apply the top layer while the bottom layer was still wet, I tore the napkin! 


Easter Egg Dish

I added a sentiment in the middle of the tray using StyleTechCraft™ Ultra Metallic vinyl in Melon #133 and my Silhouette Cameo 4. This cute bunny tray I picked up at Home Goods- man I love that store!


Easter Decore

I decorated a small bottle I had on hand with Easter paper, cardstock, and some twine. I didn't want to worry about keeping water in the bottle so I used some pretty paper flowers instead. I hope my princess loves these! 


Last Minute Valentine Art

Last Minute Valentine

 I am pretty sure that every single year I end up needing a last minute Valentine gift and this year is no exception. My sweet princess needs a valentine to display on her school desk so I pulled out some supplies from my studio and went to work. Once I had my cut file created the rest of the project was pretty quick. Other than watching paint dry of course! 


Valentine Crafts
I am so happy to be joining in the fun with the amazing ladies at Creative Crafts for a Last Minute Valentine collaboration. There is also an amazing give away so be sure to scroll all the way to the bottom of the post and check that out. 


Craft Supplies

I used a piece of chipboard I bought at a scrapbook show years ago - I had a few left over from my project. I applied three coats of Wicker White Paint, drying between each coat, then sanded the edges for a rustic look. 

Samantha Font

After all the paint was dry I gave the base a couple of spritzes of mica ink in pink, because you can never have too much sparkle! I - LOVE- the Samantha font! It is one of my all time favorites and I had to use it for this too. My sweet princess is learning to read/write cursive so she will be able to read it! I used StyleTech Craft™ Craft Vinyl in Glossy Black for the sentiment. 

Glitter Hearts

To make my cut file I use a butterfly outline and filled it with hearts of varying sizes, then removed the outline. I used StyleTech Craft™ Ultra Metallic in Dark Red to cut the design, then used the end of a paint brush dipped in Licorice to create the body and antenna. Easy peasy! 


Craft Stash Give Away

The organizers of this crafty party, Creative Crafts Collaboration, have pulled together a Craft Stash Giveaway valued at $250!  Lots of chances to win and you can see all the details here:

A Rafflecopter Giveaway


Vintage Travel Case Make Over


Monogrammed Travel Case
I found this travel case at a flea market a couple of years ago and fell in love with it. It has been hanging out in my closet since then. I wanted to update it and use it, so I decided to go with a simple monogram- I am a southern girl after all! I used StyleTech Crafts™ adhesive vinyl on the inside and the outside. 

This post may contain affiliate links. Please see my disclosure*

Glossy Vinyl

I used a monogram font from The Silhouette Store on this project. I have so many of these fonts and it makes monograms so easy to do! If you haven't check them out yet they are amazing! Since my travel case had a little bit of texture I took extra care to make sure that the vinyl was adhered well into every little dip. I used Craft Vinyl Black #499 for the monogram.

Transferring vinyl

The inside of the top of the case was not in great shape- and it was a rough fabric to start with. I decided to cover it with cardstock and apply my vinyl to that. Not only did it fix the appearance but it made it so much easier to apply my vinyl! I centered the design on cardstock that had been cut to fit and then adhered the cardstock. 

Happy Girls

I love this quote from Audrey Hepburn and it looks great cut from Ultra Metallic Red #129. Sparkle is always better for me!  I used the Samantha Font here- it is one of my favorites and I use it often. It has so many glyphs that you can add to your text and I have added a video below to show how easy it is to use them, 


You can see the whole line of StyleTech Craft™ vinyls at ATSM Crafts.

Be sure to check out their Facebook page as well for fun ideas and giveaways.


DIY Planters using StyleTechCraft Vinyl


DIY Planters

Now that Christmas is behind us my thoughts are turning to the garden in spring. I love spring! The flowers blooming, new growth, fresh green grass - I love it all! Planters on the window sill are one of the ways I get spring started a little early.  These DIY planters started with plain terra cotta pots and I used StyleTechCraft™ Glossy Craft Vinyl as the finishing touch. 

This post may contain affiliate links. Please see my Disclosure*

I am happy to be a member of the StyleTechCraft™ Design Team. They are really one of the best companies I have ever worked with! Check out their line of amazing vinyl at ATSM Crafts.
 

Milk Paint

 
I started by painting the pots with two coats of Milk paint from Plaid Crafts. I don't use this paint line very often but every time I do I remember how much I like it. It is perfect for unfinished surfaces like clay and even wood. Be sure to let it dry for 30 minutes or more between coats. 

Transferring Vinyl

Gold Adhesive Vinyl

While I was watching the paint dry I went ahead and cut my designs. For this project I used StyleTechCraft™ Glossy Craft Vinyl in Gold #485.  I really went back and forth between the gold and the black - but I really thought the blue paint set the gold off beautifully.  ATSM Crafts is an amazing online source for StyleTechCraft™ vinyl - they carry the entire line!

Do you add weeding lines to your designs before you cut? I so when I am cutting small letters. Here's a quick video showing my process in Design Studio. Of course I cut the vinyl using my Cameo 4 - I sure do love how easy it is to work with. I was ever a fan of the Silhouette brand blades until I got this one. The auto blade so far has worked perfectly on everything I have cut.  Right now Swing Design has the Silhouette Cameo 4 on sale for the amazing price of $258. If Santa didn't bring you one, go ahead and grab one now! 

Pink Plants


Be sure to like and follow the StyleTechCraft™ Facebook page for new product announcements, project ideas, and give aways. 


Turn an Old Silver Tray into Fun Christmas Decor


Upcycled Silver Tray
Do you have a ton of silver platters hiding in the back of your cabinets like me? I LOVE them and I buy way too many of them. So I decided to turn one into some fun new Christmas Decor. The best part about this project - it's TEMPORARY! Yes, the decorations are removable. I am hoping to continue this idea for other holidays. 

 This post may contain affiliate links. Please see my Disclosure*

Old Silver Tray

How cute is this little tray? I bought this so many years ago and I have used it so many times for cakes and cookies. However, it is to the point that I can no longer polish it well (it's silver plate) and it is starting to look a little worse for wear. I thought it would be perfect for an upcycle project!


VersaMagic DewDrops
I cut a piece of Bazzill French Vanilla cardstock to fit inside the tray. I used VersaMagic Dewdrops in Sahara Sand and Spanish Olive to ink the edges. Distressing with a Tim Holtz distress tool, and I added a line of faux stitching around the edge (not shown here - sorry!). 


Styletechcraft Silver Luster Vinyl
 I used a variety of StyleTechCraft™ vinyl on this project and they are all available at ATSM Craft.

  • Silver Luster #885
  • Ultra Metallic Red #129
  • Matte Removable Black #498MR

Look how much it sparkles! Notice the subtle difference between the Luster and the Ultra Metallic. The Luster is an all over sparkle; a smooth consistent color. The Ultra Metallic has more bling withe bigger bits of glitter. 


So here is the temporary part - I used Tombow Xtreme Putty to add my embellishments. I love this stuff y'all! It is kinda like the poster putty we had back in the day, but it works with heavier items. A little tiny piece and you can stick your embellishments down.  I used a light tack tape on the back of the paper so it will be easy to remove as well.


Santa Bell
I added a few embellishments from my stash; flowers, ribbon, and this super cute Santa Bell left over from a December Daily class a few years ago. 

Queen Cookie Baker Tray
Be sure to check out the StyleTechCraft™ page for color charts, great ideas, and a list of products.  I hope you are getting a jump start on your Christmas decor. I would love to see what you are working on! Please drop me a line below.


Haunted Halloween Drinks using Dry Ice


Well,, it's after September 1st which means it is officially Halloween season at our house! I love Halloween - the decorating, the baking, the parties, and especially the food. We always have haunted Halloween drinks- everyone loves them. Years ago I learned the secret to making these bubbly, fizzy drinks and they are so much fun. The hard part is finding dry ice- everything else is easy! 

 This post may contain affiliate links. Please see my Disclosure*

 Vinyl Decals

To make my drinks extra special this year I pulled out some StyleTechCraft™ Vinyl to decorate the glasses.  I used Transparent in Magic Purple #403T for the glasses.  Using my Cameo 4 to cut the decals made this project go smoothly and the designs are from The Silhouette Store. 


Reverse Weeding

When I have tiny details to weed out from my design I like to use reverse weeding. Apply the transfer tape to the design before weeding, burnishing to make sure the tape is firmly in place. Flip the design upside down and weed from the back. If you have never tried this technique you will love it for small details! 


Cupcake toppers

Of course every party needs cupcakes. Every day needs cupcakes, but that would make my hips as wide as my couch so I try to stick to only parties!   I made these cute cupcake toppers using Matte Removable (Black 498MR) and Ultra Metallic (White 149) and my Cameo 4. Clear acetate is the background- I simply layered the vinyl on top. 

Cutting Acetate Sheets

Do you use the Offset feature on your Cameo? I am pretty sure that is the tool I use the most when creating. The offset tool creates a larger version of the original- a shadow layer.  It's perfect for so many projects. 

Cupcake toppers

I find it easier to assemble these when I turn the vinyl upside and then add the acetate layer on top rather than the other way around. This keeps the acetate layer from moving around - which I swear it always does! 

Cauldron drinks

How cute are those little cupcakes! I used the following vinyls:

  • Bat- Matte Removable Black 498MR
  • Pumpkin - Ultra Metallic Orange 148
  • Skull - Matte Removable Black 498MR and Ultra Metallic White 149

Now the secret for the bubbly, fizzy drinks is dry ice and some type of citrus juice. So make what ever kind of punch you like, and be sure to add either orange or pineapple juice to it. Break your dry ice into small pieces (like quarter sized) using a hammer.  I add a chunk or two of dry ice to the bottom of the glass, then add regular ice on top. This will keep the dry ice in the bottom and off your lips. This is especially important when serving to kids (which I do at Girl Scout Camp every couple years, and it is no problem). Pour your punch over the ice and watch the magic happen!  

 You can also use a punch bowl and add a large piece of dry ice to the bowl just before serving. This is pretty dramatic and you will get lots of oohs and ahs!

  • BE SURE to use gloves when handling the block of dry ice and tongs when adding the chunks to the glasses.  Dry ice is so cold it BURNS.
  • Keep the dry ice in a cooler out of the way.
  • Put the cooler outside when you are done with it. When dry ice melts it turns into Carbon Dioxide- which we all know is dangerous. 

Be sure to check out StyleTechCraft™ Facebook and website for more amazing projects. To purchase StyleTechCraft™ Vinyl head on over to ATSMCRAFT - the selection is amazing!   


I am joining in the fun for the Third Edition of Creative Halloween Crafts. So many fun projects! Click on the image above to see them all.