Showing posts with label Valentine. Show all posts

My Funny Valentine- Sketches In Thyme Guest Maven

Howdy everyone,, how is your week going?
Have you  seen any great stuff from CHA that you just can't live without?
I have been drooling over so many things - it may break my budget!

Today I have my take on Sketches In Thyme #100 and this 
week it is a two page layout. I generally do two pagers unless I only
have enough photos for one. 
I started with white Bazzill and added PP and die cut stickers from Basic Grey's True Love. I also used Gelatos®, Prima stencil, Twine, Tsukineko inks, and all my adhesive is from Glue Dots®. I used Micro Dots for the banner, Pop-Up Dots to give my circle die cuts some dimension, and Ultra Thin Dots for everything else. The scallop circle punch is from Fiskars.
These really cute little banner pieces were on the die-cut sheer. I added them to the paper, put a line of Micro Glue Dots® across the top and layered on two pieces of twine from The Twinery.
For the color on the background, I used a Prima stencil and mixed my Bubble Gum Gelatos® with a little water in a mister to make a spray.  You can find the tutorial for it Here. 
After misting I used Guava, Bubble Gum and Red Cherry Gelatos® to make a line across the bottom of both pages, then used my finger to blend all the colors together.
For the heart on this side, once I had sprayed the stencil on the other page, I picked the stencil up and carefully flipped it upside down to get an impression from the ink left on the stencil.
Sorry my page looks all wavy! The one thing I don't like about spray inks - they wrinkle my paper up. 

Here is the sketch this week
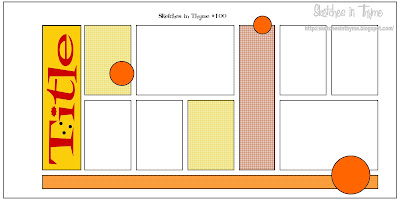
Be sure to join in the fun - you have until the end of the month to link up over at Sketches In Thyme

I am linking up at the following challenges:
Word Art Wednesday - Anything goes 
The Pink Elephant - Pink, Red and White

Thanks so much for stopping by today!
Anita

Valentine Boxes and ColourQ #124

Happy Valentines Day!!!
I hope you are having a sweet day so far :o)
My DH gave me a very cute card earlier today.

Today I have my ColourQ project. I made some very cute little candy boxes
for my daughters and one super nice soon to be son in law. 
Really, there are too many shades of RED in the scrapbooking world. I think I have about 
6 shades on here, the cardstock, the spray ink, the ribbon, the twine, the tickets, ,,,,
I really did start with the color palette in mind. But the reds threw me off track!!

Here is a filled box waiting on little hands to snatch it up,,
Of course all three of them like different candy,,, wouldn't
 want to make my life easy now would we???

Here is the color palette this week
Super pretty colors!!! 
Be sure to stop by the BLOG and see the fabulous things the ladies have made this week.
They are all so talented!!!

I actually made a card for DH this year instead of buying one. 
Shocking, I know.

I used the new Tim Holtz stamp set for this, the XO on the top, the trio 
of hearts in the middle, and the canvas heart on the bottom 
were all stamped with his new set.
The canvas heart was stamped, then cut out, brushed with Blingz (from Shimmerz) 
then I dripped Pearlz (also from Shimmerz) onto it.
Both of those Shimmerz products are from the Valentine's products kit. 
I have had a TON of fun playing with those.

I am also linking up over at
Paper Issues - Love Is All We Need
Be sure to hop over there - TONS, and I mean TONS!!! of 
cool stuff linked up over there!!!!!

Have a great day!
<3

ColourQ #122 Heart BAnner

Happy Tuesday everyone in blogland!
We have a new palette at ColourQ and it was so easy to
work with this week. Arielle always picks the best combos - I don't know
how she does it week after week!
Here is this weeks super palette
Doesn't that get you in the mood for a great Valentine project?????
Well, it sure got me in the mood for one! I saw some
wonderful banners on Pinterest and I just had to make one myself
The hearts are acrylic with the sheet music behind, but it is hard to tell in the photo. 
I used my Nesties for the scallop circles, the letters were cut on my Cricut (Storybook) then glittered
the rosette is Tim Holtz - I will never get tired of that die - a few flowers and some ribbon. Done. 
Super simple, you can make one yourself in NO time!

Be sure to hop over to the ColourQ blog, not only to see the fabulous projects
made by the rest of the DT, but also to check out our newest DT member. 

I am also linking up at Paper Issues - All We Need Is LOVE

Thanks for stopping by today :o)
Have a great one!
Anita