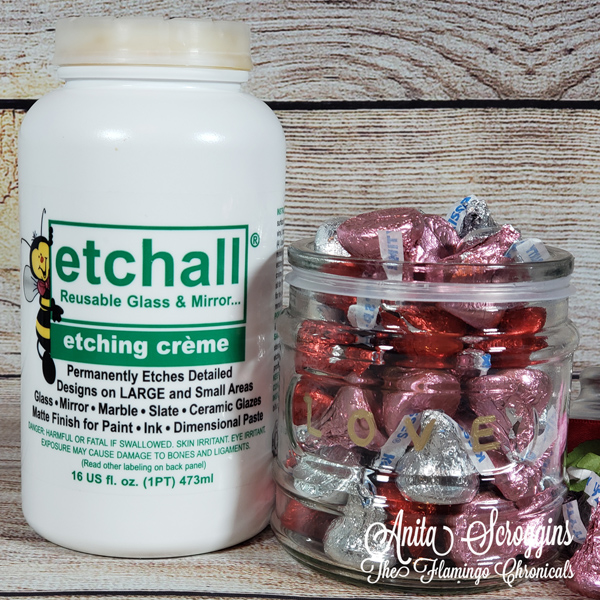
Y'all it's almost time for Valentine's Day and you know I need to give some candy and treats out to friends and family. I love to give out handmade treats and am always looking for a great container to put them in. This year I decided to make a few jars to put candy in. I picked up some small jars at the dollar store and grabbed my etchall® etching creme.
I started by using my WRMK Word Punch Board to create my stencil. I punched the etchmask® with the word LOVE for the front of my jar. There is a small recessed area on the front of the jar and I wanted something to just fit in there and this was perfect!
After I applied the stencil I used masking tape to cover the areas that I don't want to be etched. I am a messy crafter - so taping the area off is essential for me! Be sure the masking tape is pressed firmly onto the glass so no etching creme® seeps under it. Apply a nice layer of the etching creme® and allow it to sit for 15 minutes. Or if you are like me, leave it in your craft studio to go eat lunch, then get distracted and forget about it for two hours! Scrape the excess creme back into the jar and rinse the surface with cold running water. Be careful not to get the creme on any surface that you don't want to etch.
After rinsing and drying I applied Gold Rub N Buff to the surface. I normally do this before I remove the stencil. I applied two layers of the rub n buff here. I love how this turned out. I am going to make a few more so that I am ready to hand out treats on Valentine's Day.
Be sure to check out the wide range of etching supplies available for all your craft projects.
Showing posts with label WRMK. Show all posts
Magical Memories Mini Album
Hi everyone! I have a new class coming up over at The Crafty Scrapper that I wanted to share with you. I am pretty excited about this class- it is going to be so much fun!

Do you have some magical memories to record? This album is the perfect solution! We will start with the Say Cheese papers and a Maya Road chipboard album as the base, but will add additional pages and lots of extra media to create an amazing one of a kind book. Using the Cinch binding tool allows us to create an album that opens on BOTH sides and measures an impressive 20" wide when fully open!
If you have been wanting to learn to use the Cinch binding tool, or would like some more practice with it, in this class you will learn how to make your albums really interactive and personal.
I recommend Scotch Quick Dry Adhesive for covering the chipboard base of the album. If you have never used it I will be showing the method I use. Also bring a Tiny Attacher, Bone folder, black journal pen, white Signo pen, LOTs of foam tape/pop dots, and the basic class kit found on our home page.
To reserve your spot in the class, be sure to call the store 972-923-3121.
Remember, if you are not in the area, you can purchase a kit just by calling the store :) Kits will be available next month (we are waiting on the paper to ship).
Do you have some magical memories to record? This album is the perfect solution! We will start with the Say Cheese papers and a Maya Road chipboard album as the base, but will add additional pages and lots of extra media to create an amazing one of a kind book. Using the Cinch binding tool allows us to create an album that opens on BOTH sides and measures an impressive 20" wide when fully open!
If you have been wanting to learn to use the Cinch binding tool, or would like some more practice with it, in this class you will learn how to make your albums really interactive and personal.
I recommend Scotch Quick Dry Adhesive for covering the chipboard base of the album. If you have never used it I will be showing the method I use. Also bring a Tiny Attacher, Bone folder, black journal pen, white Signo pen, LOTs of foam tape/pop dots, and the basic class kit found on our home page.
To reserve your spot in the class, be sure to call the store 972-923-3121.
Remember, if you are not in the area, you can purchase a kit just by calling the store :) Kits will be available next month (we are waiting on the paper to ship).
Our Love Story Album
It's first Monday and it is time for another hop through the web ring of Designer Crafts Connection. To hop through the ring, use the Hop Back and Forward arrows on the button in my sidebar to the right.
This month's theme is "BLING" - and we all know I love bling! I started this little mini album a while back, but just hadn't finished it off.
I use chipboard for the covers and used my WRMK Corner Chomper to round the outer edges. My paper is from Authentique. I used stencils and Gelatos from Design Memory Craft to color the front cover. I used my WRMK Cinch to bind it all.
I added a 3x3 mini canvas to the front over, and I used Gelatos again to color it. I added some Maya Road chipboard pieces, which I inked and covered with more Authentique paper, then coated with Sparkle Mod Podge- which is just about my favorite thing on earth. The pearl is from Melissa Francis.
This month's theme is "BLING" - and we all know I love bling! I started this little mini album a while back, but just hadn't finished it off.
I use chipboard for the covers and used my WRMK Corner Chomper to round the outer edges. My paper is from Authentique. I used stencils and Gelatos from Design Memory Craft to color the front cover. I used my WRMK Cinch to bind it all.
I added a 3x3 mini canvas to the front over, and I used Gelatos again to color it. I added some Maya Road chipboard pieces, which I inked and covered with more Authentique paper, then coated with Sparkle Mod Podge- which is just about my favorite thing on earth. The pearl is from Melissa Francis.
To texture the cover, I used a combination of stencils, Gelatos from Design Memory Craft, molding paste, and chunky glitter, then brushed the whole thing down with Sparkle Mod Podge. I also added a stick pin that I made- you can check out my tutorial here.
Be sure to check out the other projects in the hop- there are some uber talented artists in the group and check out The Designer Crafts Connection Blog too.
Birthday Album for a Princess
Howdy everyone! Today I have a pretty little mini album to share. I made this last month for a sweet little girl turning 5 years old.
Warning: Lots of photos! :)
I used some vintage textured K&Co floral paperthat I hoarded for years. I made the title piece for the front using my Silhouette Cameo and the Cut and Print feature. I used my Cinch to bind the album.
The mom wanted lots of pockets and tags so that people at the birthday party could leave messages.
The birthday girl's name is Princess- so we needed lots of bling, lots of flowers, and lots of pink!
On the inside of the album I used quite a bit of My Mind's Eye patterned papers, punches, ribbons, and Prima Flowers.
I think I used 10 yds of ribbon in this book!
I loved making this little book, and I was so happy with how it turned out! I hope you enjoyed my book. I would love it if you left me a comment to tell me what you think!
Have a wonderful week!
Warning: Lots of photos! :)
I used some vintage textured K&Co floral paper
The mom wanted lots of pockets and tags so that people at the birthday party could leave messages.
The birthday girl's name is Princess- so we needed lots of bling, lots of flowers, and lots of pink!
On the inside of the album I used quite a bit of My Mind's Eye patterned papers, punches, ribbons, and Prima Flowers.
I think I used 10 yds of ribbon in this book!
I loved making this little book, and I was so happy with how it turned out! I hope you enjoyed my book. I would love it if you left me a comment to tell me what you think!
Have a wonderful week!
My Favorite Tool - Designer Crafts Connection Blog Hop
Good afternoon everyone! Today we have a fresh hop for Designer Crafts Connection
and our theme this month is to showcase our favorite tool or technique. To navigate through the web ring, use the arrows in the logo in my sidebar to the right :o)
I really had to do some thinking on this one, because, really, I have a lot of tools and I love them all! If I really had to narrow it down to one tool that is my all time favorite, I don't think I could. But somewhere really close to the top would be my Cinch Binding Machine from We R Memory Keepers. I really like to make mini albums, and I like to make them from scratch from bits and pieces. This machine is the bomb dot com for doing just that!
This little baby is a masterpiece. If you don't have one, you need to run right out and buy one today. For real. I mean it. Let me show you a few of the little gems I have made with this baby.
Chasing Dreams Mini Album
This started out as a Maya Road Chipboard and Kraft album. I trimmed the scallops off one side of all the pieces, then punched and bound it with my Cinch. Easy peasy.
Travel Journal - Cruise 2012
For this album, I used plain chipboard, and a ton of 7-Gypsies to fill my pages, and them bound it all together. I love that I can include anything I want with my Cinch.
December Daily 2011
For this year's journal, I even included a lot of the cards that I received from friends in the back of my album. It is so easy to include all the little things when you can punch what ever you want to!
Road Tripping
This album was made entirely from thick bookboard- and I used the coil from WRMK to bind it. The Cinch can punch a HUGE variety of materials- not just paper!
Alice in Wonderland Mini Book - Part 1
Alice in Wonderland Mini Book - Part 2
Alice in Wonderland Mini Book - Part 3
This album is a mixture of so many things! I used acrylic, chipboard, papers, and fabrics and combined them all with the help of my Cinch.
I really like to add a lot of little details to the bindings of my mini albums. The Cinch really gives me the ability to do this- I add ribbons, charms, tidbits, all kinds of things, and it doesn't matter if I use the coils or the D-rings, I have space to add my stuff!
So there you have it- one of my favorite tools. Also at the top of the list would be the;
1/4" Power Punch
This little baby can punch through anything you can fit in there. I LOVE it! It is like a Crop-o-Dile on crack.
And speaking of the Crop-o-dile,
I don't know how I ever lived without this thing. Seriously. Now,,, if they could only re-engineer it so that the punched paper piece would clear the tool and so I wouldn't have to bang it on the table to get those little pieces out.
and our theme this month is to showcase our favorite tool or technique. To navigate through the web ring, use the arrows in the logo in my sidebar to the right :o)
I really had to do some thinking on this one, because, really, I have a lot of tools and I love them all! If I really had to narrow it down to one tool that is my all time favorite, I don't think I could. But somewhere really close to the top would be my Cinch Binding Machine from We R Memory Keepers. I really like to make mini albums, and I like to make them from scratch from bits and pieces. This machine is the bomb dot com for doing just that!
This little baby is a masterpiece. If you don't have one, you need to run right out and buy one today. For real. I mean it. Let me show you a few of the little gems I have made with this baby.
Chasing Dreams Mini Album
This started out as a Maya Road Chipboard and Kraft album. I trimmed the scallops off one side of all the pieces, then punched and bound it with my Cinch. Easy peasy.
Travel Journal - Cruise 2012
For this album, I used plain chipboard, and a ton of 7-Gypsies to fill my pages, and them bound it all together. I love that I can include anything I want with my Cinch.
December Daily 2011
For this year's journal, I even included a lot of the cards that I received from friends in the back of my album. It is so easy to include all the little things when you can punch what ever you want to!
Road Tripping
This album was made entirely from thick bookboard- and I used the coil from WRMK to bind it. The Cinch can punch a HUGE variety of materials- not just paper!
Alice in Wonderland Mini Book - Part 1
Alice in Wonderland Mini Book - Part 2
Alice in Wonderland Mini Book - Part 3
This album is a mixture of so many things! I used acrylic, chipboard, papers, and fabrics and combined them all with the help of my Cinch.
I really like to add a lot of little details to the bindings of my mini albums. The Cinch really gives me the ability to do this- I add ribbons, charms, tidbits, all kinds of things, and it doesn't matter if I use the coils or the D-rings, I have space to add my stuff!
So there you have it- one of my favorite tools. Also at the top of the list would be the;
1/4" Power Punch
This little baby can punch through anything you can fit in there. I LOVE it! It is like a Crop-o-Dile on crack.
And speaking of the Crop-o-dile,
I don't know how I ever lived without this thing. Seriously. Now,,, if they could only re-engineer it so that the punched paper piece would clear the tool and so I wouldn't have to bang it on the table to get those little pieces out.
Subscribe to:
Posts (Atom)


