Showing posts with label mini album. Show all posts

Fairy Mini Album


Fairy Album

How cute is this little Fairy Album?!?!?!  I have had this base album for quite some time, it's from Graphic 45. It's TINY! Like the cover is only 4x5 tiny! I've been trying to decide what to do with it and I decided I would use it to make a photo album for my princess. She is currently with us for 2 weeks for Mimi's Summer Camp 2021. We are having a great time!


Designer Crafts Cnnection

Over at Designer Crafts Connection we all received an amazing assortment of of product from Gwen Studios ribbons. Y'all know I am a ribbon crazy crafter and I was so excited to get that box! Their products are available at Wal-Mart so be sure to check them out next time you are there. 


Ribbon Pile

I pulled a variety of ribbons from the assortment and cut multiple pieces from each roll to 6 inches long. Trim the ends of the ribbons- I alternated between a notch and straight cut on a slant. Seal the ribbon ends to prevent fraying if that bothers you. 


Layer the ribbons, alternating styles, widths, and textures. I like to just put the in a pile where the cross somewhere near the middle. I - LOVE- pom pom trim! I always add a piece or two at the top of the pile.


Cut a narrow piece of ribbon about 10" long and tie all the ribbons together tightly. I like the knot to the back of the pile, but the front is good too. 


I used a low temp glue gun to adhere the ribbon bundle to the spine of the mini album. It's placed a little off center towards the top of the album  so the bottom of the bundle sits just about even with the bottom of the album. 


This is one of my very favorite ways to dress up the spine of a mini album. There are so many possibilities with this technique. I hope you give it a try! 


Be sure to hop over to the Designer Crafts Connection blog and check out 

all the amazing projects that were made for the hop.


Meeting Disney Characters Mini ALbum Layout

Disney Characters
I am still plugging away at my mini album from out family vacation to Disney last year. I have put it away several times due to being busy with other things, but I am hoping to finish it up in the next month. I am half way there! My DD2 loved meeting all the characters at Disney - totally her favorite part. The first thing she did when we walked in was grab a character to hug!  This layout is the 2nd day of our vacation.

I used:
Paper punches
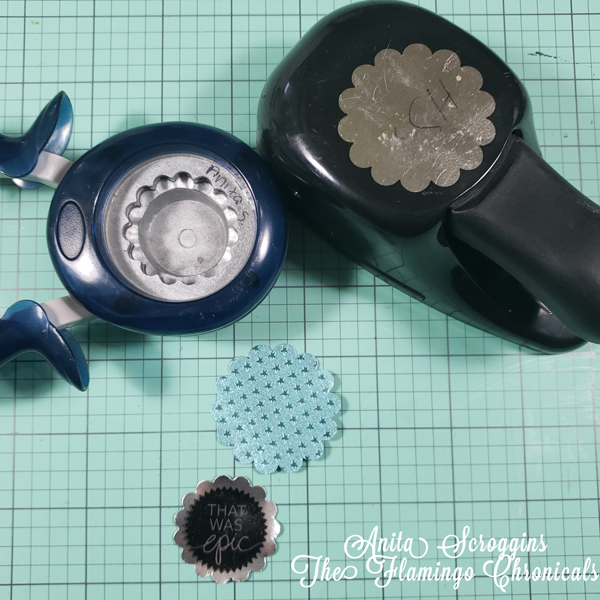
I stamped my sentiment on the Silver/Gold Glossy Foiled Paper, let it dry, then punched with a scallop circle punch. I punched a larger circle using the Turquoise Starstruck Foiled paper.
Use Gossy Accents to adhere them together.

Embossing folders
I ran a piece of the Turquoise/Gold Glossy Foiled paper through my die cut machine using an embossing folder then cut a narrow strip just one circle wide. Use Glossy Accents to adhere to your page.

Layered punches
Here's the final result- lots of texture but still very flat. Which is important when I am trying to squeeze 9 days of vacation into one small SNAP Album!

Check out all the amazing things you can do with Rinea Foiled Papers over on the blog


Mixed Media Steampunk Mini Album


Steampunk mini album

I'm pretty excited to be participating in a blog hop with {a vintage girl} products over on the DCC blog. I have created a mixed media steampunk album with my friend Candy's fabulous mini album blank.  Be sure to jump over to the Designer Crafts Connection blog starting May 15th to see all the amazing projects created by the team. There is also a prize up for grabs!! More details at the bottom of this post.

 This post contains affiliate links. Please see my disclosure policy* for more information.

 https://designercraftsconnection.blogspot.com/2019/03/a-vintage-girl-vintage-steampunk.html


A vintage girl


I started with the Steampunk Gears Chipboard Album from {a vintage girl}. I have to admit- steampunk is NOT my thing. My little kid loves it. I know it's popular. I could just never get into the whole steampunk thing. But,, I love this little album! It has a variety of page mediums, corrugated, whiteboard, and plain chipboard.


Lindy's stamp gang embossing powders


Heat set embossing powders
To decorate the front cover I started with a base layer of ink. I used an Olive Green Dew Drop from Tsukineko. I rubbed the ink pad all over the front, ending up with an uneven coat of ink.  Working with a chalk ink is perfect for heat embossing - you have a longer set time. Before the ink had set I sprinkled a variety of Lindy's Stamp Gang embossing powders. I randomly poured colors over the cover until I liked how it looked then heat set. 


embossed chipboard
I covered the second page in the album with Authentique paper. This is actually a Christmas line (Glistening)!  I loved the colors and they worked will with this project.  I added some splatter with iZink Ink Sprays from Aladine. If you look closely you can see that the droplets dry with a darker edge- it is two toned! It is also sparkly and I love it! I adhered the second page to the back of the cover page. 


http://designercraftsconnection.blogspot.com/

 Be sure to hop over to the Designer Crafts Connection to check out all the amazing projects created with {a vintage girl} products. 

There is a fabulous prize up for grabs! Be sure to head over to the Designer Crafts Connection blog and enter!


Spooky Halloween Mini Album - Halloween Popcorn Box Party

Halloween Popcorn Box Party
It's Halloween so it's time for a few new tricks and treats and the Halloween Popcorn Box Party is serving up both! There are 75 wonderful designers who received product from the fabulous sponsors to play with and I came up with a fun Halloween Mini Album. 

The sponsors for this party are amazing - Adornit, World Market, Kunin Group, Udderly Smooth, Tombow USA, Expressionary, Ellison/Sizzix, Expo International, Oriental Trading. Be sure to check them all out!

This mini album will get a lot of handling by a toddler, so it needs to be durable and stand up to a lot of wear. The Deflecto Sign Tags are perfect for making pages in a mini album! They can be punched with all the binding machines on the market, decorated anyway you like, and they hold up to an amazing amount of wear. I made a template for my page size and cut the sign tags using a craft knife and a metal ruler.


The Sign Tags can also be cut with the large steel rule type dies. I wanted this amazing frame on the cover, but since it sticks out there is no way it would survive made from paper. The Sign Tags are not only durable, they are flexible as well. Pretty much toddler proof.

See that little spider on the front - Oriental Trading. Cuteness overload. The pumpkin is Kunin felt, the fence is matboard, both are die cut with vintage Sizzix dies.

 I love these little Trick and Treat trinkets. Guess where they came from?? Oriental Trading! Yep. They are a few years old, but I think we all know that I am a hoarder.

Who doesn't like pompom trim??? I think we should drape the whole world in pompom trim - it would make everything better! My papers are from Doodlebug Designs the are vintage designs.


The inner pages were decorated with patterned paper and a variety of embellishments.The pumpkin is a Laura Kelly die cut from Sizzix. The little black cat - did you know that you can cut Kunin Felt with thin dies?? Yep, you can. (die from LittleB).


Be sure to check out the post with all the projects shown. There are some fabulous things to check out.  You can find it here

Of course there is a prize up for grabs! Enter here for your chance to win.

a Rafflecopter giveaway


Stitched With Love Purse Album - The Tutorials

Purse Mini Album Tutorial
If you took my Stitched With Love Purse Mini Album Class at the Crafty Scrapper or bought the kit, here are the extra tutorials you will need to finish the album. If you have any other questions or need more info don't hesitate to contact me. There is a button on the right side of my blog to do just that!

Spine:


The spine of the album has been pre-scored for you. Notice how it is divided into narrow and wide sections - one narrow, two wide, one narrow, two wide,,,, I always number mine to keep it straight (or I mess it up every time, I promise you). Number the wide sections #1 - #8 as shown  (it doesn't matter which side you start from). Apply 1/4" tape to the numbered sections as shown.

At this point you are going to fold the paper, on each and every score mark, forwards and backwards, using your bone folder to really crease the paper. The purpose of this is to make each fold as flexible as it can be so that the pages will open up and lie flat when the spine is in the album. So, start at one end, with the first score mark, and fold it one towards you and crease really well, then fold it away from you and crease really well. Move on the the next score mark and repeat,,,,, all the way down the line.


To blameless the spine, pull the backing from ONE piece of tape at a time off and fold the two wide sections together so that you have a ridge that looks like this. Repeat 8 times.

Your spine will look like this when all the sections have been adhered together.


Next step: Clip the corners of each ridge, on both sides, then add 1/4" score tape to one side of each ridge. The tape will allow you to add your pages later on in the assembly process.

Flip the spine over.  We need to treat the back like it is three different sections - two sides and a middle. The middle section - the space between the two arrows - is the portion that will be adhered down on the center chipboard of the album. Cover the ENTIRE center section with strong tape (leave the backing on) and then cover the side sections in tape as well. BEFORE removing the paper backing from the center section, fold the two side sections up and place the center section down on the album so that you can gauge your placement. You will only get one chance to get this in the right place - so take your time. You want to have an even spacing between the top and bottom of the album (see below) and the center section should fit just about perfectly on the chipboard piece. When you feel comfortable, remove the paper backing  from the center section ONLY and carefully place on the album. Once that is done, remove the backing from one side section at a time and press those into place.

Notice the even spacing from top to bottom - try and get as close as you can. (this photo has the inside decorative papers already in place - evidently, in the bazillion photos I took I didn't get one with just the spine inside the album. :(  )

Handles

This one is coming! I have to reshoot a couple of the photos because they were blurry.


Botanical Mini Album

I taught this fun little mini album recently at The Crafty Scrapper in Waxahachie. I fell in love with the Kaisercraft papers as soon as they came into the store although they are not my normal go to colors.

As a general rule I RUN from purple - seriously. But these papers were so beautiful I just couldn't resist them!!  I used a mix of the 12x12 papers and the 6.5 x 6.5 paper pad and of course I added in lots of extra stuff to fill out my album. For the front cover I used a chipboard left over from another album, a Tim Holtz die to cut some Little B Chipboard which I embossed with my Eileen Hull folder from Sizzix. Lace is from Maya Road and flowers are from Petaloo. And of course, all my inks are VersaMagic DewDrops from Tsukineko - because I love them so much!!

On the left page I used a coin envelope to hide a tag for journaling. On the right side I used a stamp from Wendy Vecchi and the cute little clay pot die is from Eileen Hull.

One of my favorite ways to add an extra page in is to line a a few tags and use washi tape to hold them together. By the time you add papers to the front and back it is very sturdy!

We all know I love to add pockets, flaps, and lots of interactive pieces to my albums. I added a fabulous punched flap to the Graphic 45 Lg tag. Adding Glossy Accents to the punched portion really adds strength to it.

How awesome are these colors against the black here!

The page on the right is a 5 x 7 kraft envelope - perfect for tucking memories into the top.

I used another Wendy Vecchi stamp for the tag on the left. The back of the album is a from Heart Of Texas Studios.  I used my Cinch Binding tool from We R Memory Keepers to pull it all together and added lots of ribbon.

There is ONE kit left for the album. If you are interested in it- please contact the store directly at 972 923 3151.

Thanks for stopping by today and have a wonderful week!


Magical Memories Class

I am so excited about the new class I am doing at The Crafty Scrapper. I had so much fun creating this class and you will love this little book to hold all your Magical Memories. I have used the uber cute Say Cheese I and Say Cheese II paper lines from Simple Stories.


 I started with  Maya Road Oh Snap bare chipboard album and added tons of media to make it my own. Because I can never make anything that is flat I added some Filmstrip tape from Tim Holtz for depth and dimension. I LOVE the way this turned out!


Because I like to have lots of dimension in my books I added several die cuts made from Eileen Hulls mat board and dies from Sizzix.

Coin envelopes are the perfect way to add pockets to your mini albums!

I don't normally use a lot of stickers for my albums, but I adored the 12x12 sticker sheet with this line. Sooooo very cute!!

We all know how much I love my Cinch from We R Memory Keepers. I used it here to bind the album and to add some additional pages to the other side. This album measures an impressive 20+ inches when it is fully open!


There are LOTS of ribbons included in the class kit as well, I just photographed the book before I added them for some strange reason :(
We have had this class once, and it is on the schedule again for July 26th. There are also kits available if you are unable to make the class in person. Contact the store directly at 972- 923-3151 to reserve your spot in class or purchase a kit.

Thanks so much for stopping by today!