Showing posts with label Ribbon. Show all posts

Sublimation Wine Stopper DIY - Easy and Fun


Sublimation Stamp Pads Wine Stopper

Now that Christmas is behind us my thoughts are turning to spring and all the fun crafts that brings. Valentine Day is not a huge deal for us, because our wedding anniversary is that same week. But, I still like to mark the occasion - and wine is a must! 


This month the Wine Stopper is the Blank of The Month at Artesprix and it is adorable y'all. You really need to grab one - or a couple - before they are gone. They are HEAVY too - much more than I expected. AND- they each come with 4 sublimation ready gloss white inserts - so you can change them up if you wanted to!


Artesprix Wine Stopper Sublimation

I grabbed a bottle of wine - Moscato is my favorite - added some lace to dress it up, and tied a matching ribbon to hold the wine stopper in place.  

Supplies:

Artesprix Wine Stopper 

Artesprix Sublimation Stamp Pad - I used Pink

Artesprix Sublimation Marker pack

Artesprix Heat Tape

Artesprix Protective Paper

Heat press - I like this one. It is easy to travel with and doesn't take up a ton of space!

Copy Paper

Pencil

Scissors

Stamps and stamping block

Sublimation Step by Step

Step 1 : trace the blank onto copy paper using a pencil. Never a pen! Pencil will not transfer onto the blank, but a pen will.

Step 2 : stamp your design on the copy paper using clear acrylic stamp and Sublimation Ink Pad. Remember- the color of the ink changes dramatically when it is heated!

Step 3 : I used a marker and colored over the stamped image to fill the entire outlined space. 

Step 4 : place the blank face down onto the design and secure with heat resistant tape. NOTE: this blank has a protective top sheet that must be removed prior to pressing. Don't be like me and forget that step the first time!

Step 5 : (not shown) make a "sandwich" with the protective paper enclosing the blank inside, with the copy paper UP. 

Heat press - for the wine stopper it is 385° for 45 seconds. Carefully remove from protective paper and peel one side of the copy paper back to make sure everything looks great before removing it completely. 

Ta-da! You have a beautiful sublimated blank. Add to the actual wine stopper using the double sided adhesive already in place, just remove the paper covering and press the sublimated blank into place. 

DIY Sublimation Wine Stopper

 Look how adorable this is! Everyone on your list is going to love getting one of these.


DIY Ribbon Flower Headband


Floral Headband

This month at Gwen Studios the challenge is "Romancing the Ribbon". I decided to make a flower headband for my princess. DIY flowers are so easy to make too. I used a white grosgrain from Gwen Studios which is available at Wal-Mart. 

Supplies:

Gwen Studios


DIY Ribbon Flowers

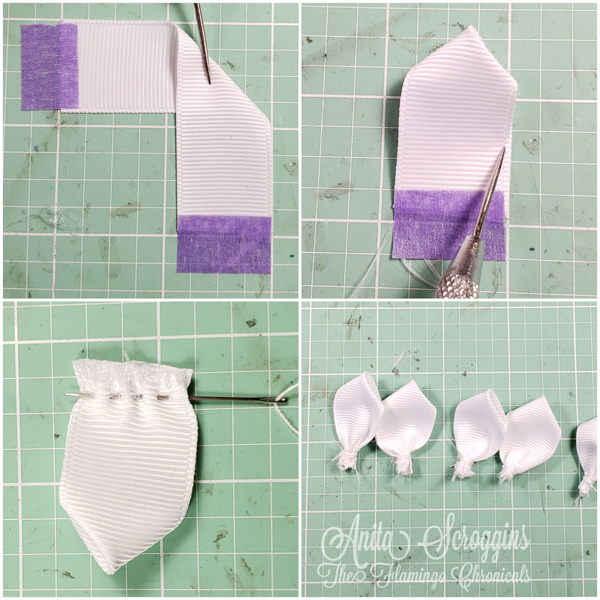
Start by cutting 4 pieces of ribbon, each 3" long. The process for folding them is easy, it just takes a little practice!  I use the grid on my mats to help me get them even. For the 3" length I line the corner of the ribbon up a shown in the first photo above.  Once I have it lined up, fold the upper cut edge (on the left in the photo) over to line up with the lower cut edge (on the right in the photo). Pick the ribbon up and thread a needle through the bottom as shown. Gather the bottom together, wrap the thread around it a couple of times, then tie the thread off. Repeat 4 more times! (The purple tape is there for the photo only, I don't normally use it!).


Flower assembly

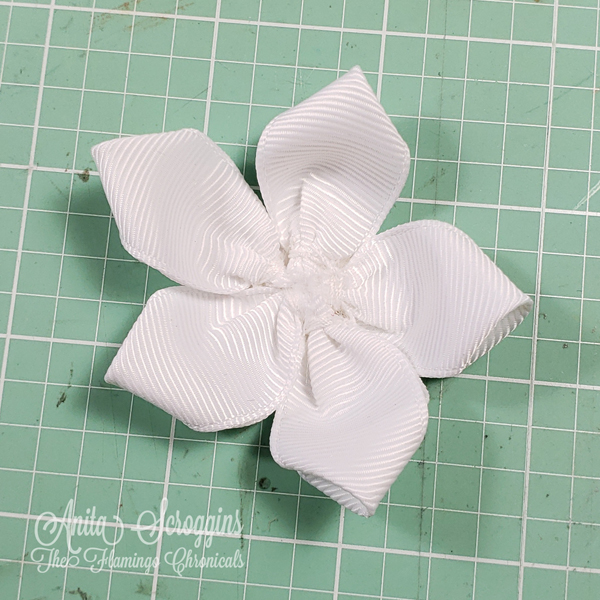
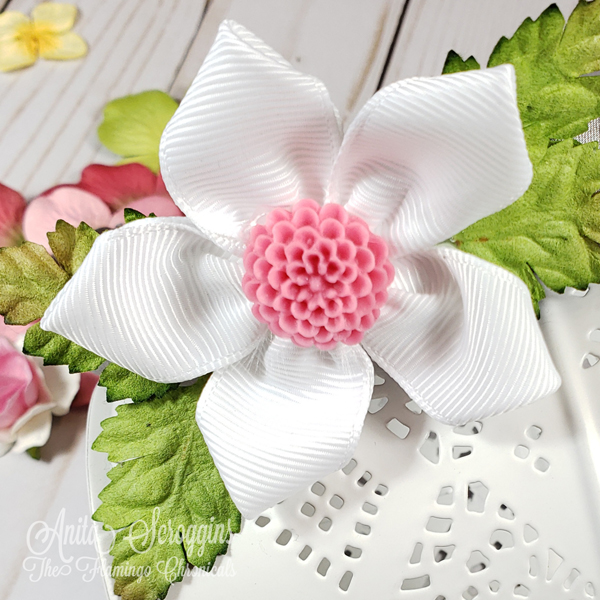
Trim the bottoms of each petal close to the wrapped thread being careful not to cut the thread. Use hot glue to adhere the petals as shown to a small circle of cardstock.  Add a pretty center and you are done!


White ribbon

Ta-da! Look how pretty it is! I love how these flowers look. Imagine a rainbow of ribbon flowers on a headband or pillow! I used hot glue to adhere it to the headband and I added a couple of paper leaves to each side to fill it out. 


Ribbon Flower Headband

I can't wait for the next time the princess visits so she can wear it. I think she is going to love it! 

Be sure to check out all the great projects from the Gwen Studios design team over on the blog. There are some fabulous projects! 


Fairy Mini Album


Fairy Album

How cute is this little Fairy Album?!?!?!  I have had this base album for quite some time, it's from Graphic 45. It's TINY! Like the cover is only 4x5 tiny! I've been trying to decide what to do with it and I decided I would use it to make a photo album for my princess. She is currently with us for 2 weeks for Mimi's Summer Camp 2021. We are having a great time!


Designer Crafts Cnnection

Over at Designer Crafts Connection we all received an amazing assortment of of product from Gwen Studios ribbons. Y'all know I am a ribbon crazy crafter and I was so excited to get that box! Their products are available at Wal-Mart so be sure to check them out next time you are there. 


Ribbon Pile

I pulled a variety of ribbons from the assortment and cut multiple pieces from each roll to 6 inches long. Trim the ends of the ribbons- I alternated between a notch and straight cut on a slant. Seal the ribbon ends to prevent fraying if that bothers you. 


Layer the ribbons, alternating styles, widths, and textures. I like to just put the in a pile where the cross somewhere near the middle. I - LOVE- pom pom trim! I always add a piece or two at the top of the pile.


Cut a narrow piece of ribbon about 10" long and tie all the ribbons together tightly. I like the knot to the back of the pile, but the front is good too. 


I used a low temp glue gun to adhere the ribbon bundle to the spine of the mini album. It's placed a little off center towards the top of the album  so the bottom of the bundle sits just about even with the bottom of the album. 


This is one of my very favorite ways to dress up the spine of a mini album. There are so many possibilities with this technique. I hope you give it a try! 


Be sure to hop over to the Designer Crafts Connection blog and check out 

all the amazing projects that were made for the hop.


Spring Banner- Home Decor

Hi everyone, I am guest blogging over on Craft Paper Scissors, be sure to stop by and check out all the amazing projects!  I love Spring! It is my favorite time of year. Everything is coming alive in the yard, the birds are singing, the flowers are blooming and the world is happy. I like for my decor in the house to reflect those same feelings so cheery and full of color is the name of the game.

This year a created a new banner using laser cut wood pieces, cardstock, colorful flowers, and lots and lots of fun ribbon!


I found these wood cutouts at a popular chain craft store last month and I knew that I had to make a banner with them- they just yelled SPRING at me from the shelf. I started by covering the wood with two layers of VersaMagic ink in Pink Petunia, glueing them to cardstock when dry.


I pulled out my trusty decorative edge scissors and trimmed around the edges of the shapes- no measuring, I just eyeballed it. Then the real fun began! I pulled lots of spring colored flowers from my stash (have you seen my Prima Breeding Program?) and started layering them together. For the section on the right above, I punched three pieces of patterned cardstock in staggered sizes, shaped them, layered them together using foam tape, then added that onto a larger daisy. Easy peasy- super fun flower!


For the flower on the left I used vintage crepe paper and an XXL Glue Dot to create the back section, then adhered a ruffled flower in the center to complete the look. I have several tutorials on making your own flowers here.

For the section on the left I made a ruffled flower using Italian Crepe Paper, using a Maya Road trinket as the center, then adhered it into a hoarded vintage Martha Stewart paper flower (shown in the previous photo on the right). For the right section, I layered 7-8 hoarded vintage Prima flowers, using my Tiny Attacher to secure them in the center. These are the nice, big ones they used to make that came in the cans that are about 4" across. I really miss those!

 Something I do every time I make a banner is group lots of ribbons between each section. I just love the way this looks. I picked up this technique years and years ago in a class, so long ago I don't even remember what the class was about or for! The process is simple- grab a bunch of different ribbons, clip them to about 4" and lay them on your work surface. Take one ribbon and clip it a little longer- about 6" and use this one to tie all the others into a bunch, using a sturdy knot. Then tie that onto whatever string you have going from section to section. Easy peasy.

Thanks so much for stopping by today!

Wedding Bouquet with Offray Ribbon

Good morning everyone~ This month I had an opportunity to work with one of my very favorite things- RIBBON! Offray Ribbon and Designer Crafts Connection are joining forces this month to show off the some of the fabulous things you can do with ribbon :)

I received some fabulous metallic ribbons in White, Lavender and Silver and the first thing I thought was WEDDING. So that is what I went with.
Smaller, family style weddings are my favorite, and it is pretty easy to make your own bouquet from fresh flowers.

Start by gathering your flowers and stripping all the leaves from the stems. Start with the flower you want in the center of your bouquet, and start adding flowers around it, holding them all in your left hand (or right, if you are left handed) as you add to the bunch. Once you have the bouquet as full as you want it, make sure the edges are pretty even and the whole thing looks balanced. Trim the stems about a couple of inches longer than your final length and use a heavy rubber band to hold the stems together while you work with them.

I made some small bows to use as filler in the flowers with Cosmic Lavender ribbon; set those aside for now. For the first layer of ribbon, I start at the bottom of the stems and tie a square knot with the ribbon to keep it in place; trim the short edge off. For this layer I used Cosmic White and wrapped it overlapping layers all the way to the top of the stems, tying another knot to secure; trim edges. For the top layer of ribbon I used a Silver Satin 3/8". For this layer you will need to find the center of your ribbon (I used about 2 yds) and place the center behind the stems at the bottom. Bring the ribbon around to the front and tie a square knot. Add a decorative floral pin in the center of the knot to keep it in place. Wrap the ribbon in a crisscross pattern up the stems, overlapping them in the front about every inch or so; insert a pin where they overlap (don't tie knots here). When you get to the top, wrap the each side of the ribbon around the stems a couple of times, then tie a knot to secure.

Once you have finished wrapping, trim the stems just below the ribbons, leaving about 1" showing.

I added a large bow made with the Cosmic White and Silver Satin, and tied it just below the flower heads on the front.

 I tucked the Cosmic Lavender bows in the top of the bouquet where ever I needed a little filler.

Be sure to add ribbon to your accessories so that everything coordinates! Here I used the Silver Satin on the cake server, adding a matching fabric flower on top.

Thanks so much to Offray for the fabulous ribbons to work with :)  Be sure to hop through the entire web ring to see the other amazing things the designers came up with.  You can navigate through the ring by using the logo on my right sidebar.


Thanks so much for stopping by today and have a wonderful day.


Party Banner- DCC Blog Hop

Hi everyone, are you recovered from the holiday? 
I painted all weekend getting ready for my DD2s baby shower that is in a couple of weeks.

I am all about making party decor right now and so today I have a 
super fun and cute banner to share with you.

 This banner came together really quickly, until I got to the ribbon tying part anyway!
I used my cameo to cut out the base shapes using Kraft CS, and the letters too.

After I had the base shape cut out, I glued the pieces onto vintage music sheets and cut out, 
this gave the banner a heavier bottom layer than just the sheet music alone would have.

I layered on the pink and white mats, using my pinking shears on the pink layer. 
I added the letters on top and drew a little squiggly line around the white piece with my Stickles.

I always outline alpha pieces when I add them to a project to give it more depth. 
I just use whatever black marker is handy.

So everyone knows that I have some issues with ribbon- I love ribbon and a banner is the 
perfect way to use a LOT OF RIBBON. I just cut up whatever strikes my fancy, put a bunch of pieces into a bundle and tie them up. Add a flower in the center and you are good!!

Of course, I had to add just a few flowers on the end pieces, just because I love paper flowers!


Thanks so much for stopping by today. 

Have a wonderful week!
May the Flamingos be with you.

Anita

Christmas Layout - SNS

Hi everyone in blogland! 
Are you counting the days until the Black Friday sales? 
I am so happy to report that I am finished with my Christmas shopping!
It is a lot easier now that the kids are grown, I admit. 

I am not a chronological scrapbooker, I scrap whatever photo I feel like picking up.
So these days I am working on some very old photos from when my girls were very little!
 
My papers for this project are from Bo Bunny. 
I also used some Maya Road, Spellbinders, EK Success punch, Prima, and a
bunch of stuff from my stash.

I used my Cricut E2 and Sticker paper to create this embellishment, then burnished with Sonic Silver GL.
My flowers were accented by coating with Brushable Glue and Crystal Ice GL.

 
The chipboard pieces were painted with white acrylic, while wet I sprinkled with Starfire GL.

These small roses, and the others like them on my project are from I Am Roses
they have some awesome flowers!


 For this photo frame and the red punched border along the bottom of the page, I applied Tear-ific-Tape to my cardstock, die cut the image, removed the backing paper and then burnished with my glitter.
Easy peasy! For complete instructions on the project, see my gallery 

I am linking up at the following challenges;
4 Crafty Chics - Snowflakes
 I Am Roses - 2 flowers (the red and white small roses)


SNS Supplies:
Thanks so much for stopping by today to visit!
Have a wonderful week and a fabulous Thanksgiving next week!
Anita