Showing posts with label Sizzix. Show all posts

Spooky Monster Popcorn Box

This post may contain affiliate links.


Halloween popcorn box
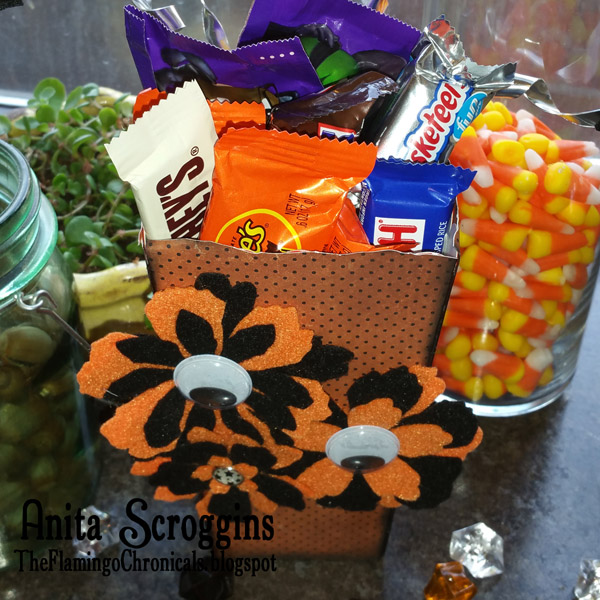
Spooky greetings y'all! I am so happy to be taking part in the Halloween Popcorn Box party of 2017 hosted by Laura Kelly. This is such a fun and creative event. I turned my popcorn box into a Spooky Monster!  I used the popcorn box from World Market as my base of course. To create my monster I covered the box in patterned paper and inked him up. 

Die cut felt
I die cut the amazing Kunin felt using dies by Eileen Hull to create these spooky fun flowers. Did you know that Kunin felt is made from recycled bottles? Totally true! I LOVE that! Twelve bottles equals one pound of fabric. The felt is weather resistant and fade proof, great for outdoor decor.
The giant google eyes are from Oriental Trading Company. What kid doesn't love giant google eyes? 

Flying bats

What would Halloween be without a few bats? To make these cute bats fly I attached them to the end of Deflecto Flexible Sign Danglers. These things are super cool- they are made of thin metal that you can shape any way you want and they have adhesive at each end on a little tab. You are going to want some I promise you.

Halloween treat box

 Stuff with candy and you have the best Spooky Monster on the block! 

Thanks so much to the sponsors of the 2017 Popcorn Box Party Blog Hop for providing supplies to the bloggers or prizes. 


No Sew Alphabet Matching Game

Toddler Alphabet Game
Designer Crafts Connections is designing some fabulous projects with Kunin felt this week. I decided to make a fun game for the princess and came up with this No Sew Alphabet Matching Game. I am so happy with how my project came out AND how quick and easy this was to make. Seriously y'all.  I can spend hours dawdling over a project but this one came together just exactly how I wanted it!! AWESOME~!!!

Anyway,, Kunin Felt Group was so nice to send me some samples of their Premium 8oz and Classic 5oz felts. Did you know that they recycle water bottles to make their felt??? 12 recycled water bottles equals one pound of fabric. Is that seriously the coolest thing? So now you can say that you are helping the environment by crafting!

Kunin Felt Toddler Game
Supplies:
Kunin Felt:

Cutting Felt squares

I started by choosing my felt and cutting it into squares. I needed to cut each letter twice (shadow and regular) so I would need 52 squares.  I picked out eleven colors of the 9x12 Classic Felt. I cut my felt into 2.5" squares, which was slightly larger than the largest letter. Using my rotary cutter and straight edge ruler made this process go so much faster. If you do any kind of cutting I recommend you invest in one of these - they are the bomb. But BE CAREFUL! They are super sharp. Follow the directions on the package when loading and cutting.

Colored felt squares
Next up I needed to sort the squares by color and decide what order they would go in on the board. Now, you could skip this step completely, but my OCD self can not. I need all my colors to be in harmony and I need them to be evenly spaced. But that's just me. You do what makes you happy!
After I had them all arranged in order, I started from one end and went down the line picking up squares in a stack until I had 26. I did the same thing again for the second stack, picking up right where I left off rather than going back to the beginning of the colors. This makes the colors staggered so the top and bottom layers are different colors.

Colored felt alphabet
I used my die cutter and some very old Sizzix dies for these letters. I designated one stack of felt squares for the shadow and the other stack of felt squares for the regular letter. Then cut out all the letters. Since both pieces of each letter were on the same die, it was pretty quick. I was able to put two dies at a time through the machine.

Felt alphabet game
I used the grid on my cutting mat to help me line the letters up on the 12x18 piece of Premium Felt. I started at the center 6" mark and lined the first column up there. Then I moved 2" out for each column to the left and right.  So my columns are aligned at 2", 4", 6", 8", and 10" from the left edge.  I just kind of eyeballed it for the space between the rows. I just wanted to make sure each row was straight. Glue the shadow ONLY of each letter down once you have the all lined up.

Pom Pom Trim

I also added some adorable pom pom trim to the top and bottom. Pom Pom trim is perfect for everything! Because I figure the princess is going to do a lot of pulling on that trim I used my glue gun on it. I love this model from Surebonder because it has a fine tip to get the glue just where I want it!

no sew matching game

I can't wait until the princess is here next so we can play with this! She loves singing her alphabet.

Be sure to check out the Designer Crafts Connection Blog and check out the amazing projects from all the designers. We all had so much fun designing with Kunin felt!


Toddler Sorting Bins

This post may contain affiliate links. By clicking on the link and making a purchase you are supporting my site. 
The price you pay does not change.

Easy toddler sorting bins
Howdy y'all! We are all about sorting things at my house when the Princess is here. She absolutely loves these fun pasta pieces I picked up at the Indian Market a while back. Toddler Sorting Bins with interchangeable labels is a great way to keep her busy and entertained - and learn some new skills at the same time.

I started with three bins from the 9 Bin Carousel Rotating Organizer from Deflecto. I used the carousel as a desk top organizer (see it here) but I had 3 of the small bins left over. They are perfect for this little game!

Wide Double sided tape


I started by covering the bins with layers of fun patterned paper. Our princess has a propensity to pick at loose things. So I used some SUPER sticky double sided tape from Sparkle N Sprinkle to cover the entire back of the papers. Double sided tape works beautifully for attaching items to these bins.


Magnetic Sign Holders
Layered felt flowers cut with Eileen Hull's die from Sizzix decorate the front of the bins. I used hot glue to attach the VersaGrip™  Magnetic Sign Sign Holder inside each bin. I also used hot glue to attach the macaroni pieces to the labels before inserting them in the sign holders. My Sure Bonder Mini Detailed G


die cut labels Sizzix
I die cut several sets of die cut labels so I can change out the things we are sorting. I dressed up the label edges with VersaMagic ink from Tsukineko and some faux stitching.


Embellished Christmas Stocking

 Who doesn't love a beautiful embellished Christmas stocking? I also love all the parties that Christmas brings. Last week I went to a Girls Night Out and we had a Stocking Exchange. Being the crafty person that I am, I grabbed some Rinea Foil and a trusty Sizzix die and went to work!
   
 
 I love Eileen Hull's flower dies - and they are perfect for cutting Rinea foil with. You can cut several layers at a time which makes the work go quicker. I used both the smooth foil and the embossed foil for this project.
 
 I ended up using multiple dies, stacking several layers of petals together and using a tiny attacher to hold them together. I used my Surebonder hot glue gun to attach the Maya Road resin flower to the middle.
 
 
 Shaping the foil is a breeze - just pinch the petals, or roll them around a pencil. They stay just where you put them! 

Be sure to check out Rinea Foil - they have some amazing products  and you are going to love them! Their inspiration team is wonderful too - so many great ideas for you to see. 

Thanks so much for stopping by today! Merry Christmas to you and yours.


Spooky Halloween Mini Album - Halloween Popcorn Box Party

Halloween Popcorn Box Party
It's Halloween so it's time for a few new tricks and treats and the Halloween Popcorn Box Party is serving up both! There are 75 wonderful designers who received product from the fabulous sponsors to play with and I came up with a fun Halloween Mini Album. 

The sponsors for this party are amazing - Adornit, World Market, Kunin Group, Udderly Smooth, Tombow USA, Expressionary, Ellison/Sizzix, Expo International, Oriental Trading. Be sure to check them all out!

This mini album will get a lot of handling by a toddler, so it needs to be durable and stand up to a lot of wear. The Deflecto Sign Tags are perfect for making pages in a mini album! They can be punched with all the binding machines on the market, decorated anyway you like, and they hold up to an amazing amount of wear. I made a template for my page size and cut the sign tags using a craft knife and a metal ruler.


The Sign Tags can also be cut with the large steel rule type dies. I wanted this amazing frame on the cover, but since it sticks out there is no way it would survive made from paper. The Sign Tags are not only durable, they are flexible as well. Pretty much toddler proof.

See that little spider on the front - Oriental Trading. Cuteness overload. The pumpkin is Kunin felt, the fence is matboard, both are die cut with vintage Sizzix dies.

 I love these little Trick and Treat trinkets. Guess where they came from?? Oriental Trading! Yep. They are a few years old, but I think we all know that I am a hoarder.

Who doesn't like pompom trim??? I think we should drape the whole world in pompom trim - it would make everything better! My papers are from Doodlebug Designs the are vintage designs.


The inner pages were decorated with patterned paper and a variety of embellishments.The pumpkin is a Laura Kelly die cut from Sizzix. The little black cat - did you know that you can cut Kunin Felt with thin dies?? Yep, you can. (die from LittleB).


Be sure to check out the post with all the projects shown. There are some fabulous things to check out.  You can find it here

Of course there is a prize up for grabs! Enter here for your chance to win.

a Rafflecopter giveaway


Table Top Easel Photo Display

Table Top Easel

Today I have a fun project to share using Deflecto Wet-Erase Sign Easel.  These handy little things come in a three pack and you can use the chalk markers shown here to make quick changes for everyday use.

http://deflectotocraftwith.blogspot.com/


Decorated table top easel

For today's project however, I wanted something a little more permanent so I started by using a paint pen to draw the uber cute border you see here all the way around the chalkboard. I matted a photo of The Princess and added that using foam tape for some added dimension.

Flowers made with Eileen Hull dies and Vintage Sewing Patterns
To make the flowers I used some of the new dies I FINALLY tracked down from Eileen Hull for Sizzix. I used vintage sewing patterns and added a resin center to the smaller one.

Folded Paper Banner

 The title for this piece was probably the easiest thing I have ever come up with! This child has the bluest eyes - they are amazing. To make the banner I cut and folded a piece of patterned paper and adhered to the bottom of the easel. Some alpha stickers and a Maya Road wood embellishment finish it off.

Be sure to check out all the fun stuff Deflecto has to offer, you can find us all over the web!


This is a sponsored post. Deflecto has provided product in exchange for my creative ideas, views, and opinions.


Appreciation Flower Pocket Gifts

I am so happy to be a guest over on Eileen Hull's Blog to share these amazingly cute Flower Pocket Thank You gifts. Back at CHA in January I was fortunate to be part of a group of makers who taught Make N Takes in Eileen's Booth, complete with her vintage camper Scotty. Eileen shared one of her extras for this new die coming out with me - happy me! As a Director for a Girl Scout Camp every year I am always in need of fun and easy Thank Yous - these hit the mark.


For the front of the Flower Pockets I wanted tiny little pots over flowing with flowers. How cute are these? I added a tag using a Stampin' Up punch, Kraft cardstock and some older Karen Foster stamps. I added faux stitching with my PITT Journal Pen from Faber-Castell. 
  

 I used the Candy cup die, some LittleB chipboard, paper, and an adhesive sheet from Thermoweb.  


After die cutting I cut the sections apart, inked them, shaped them a bit, then adhered using Super Tape down the sides and a Foam Square in the middle.  I used a hot glue gun to adhere a variety of wired and flat flowers in place.
 
I used an older McGill punch from my supply and my favorite Gelly Roll pen from Sakura to add accents to my flower pots. 
   My papers are from My Mind's Eye and Graphic 45.
I used a variety of flowers,some flower making supplies from the cake decorating department, plus some embellishments from the wedding aisle to fill my baskets.


Because some of the flowers are on wires that allowed me to arrange them to show dimension in the baskets.


Be sure to hop over to Eileen's blog to see the amazing things going on over there.  She has an amazing inspiration team working for her. You can also find where to buy all her amazing dies and other products. 


Re puposing craft supplies to make Mixed Media Cards

Mixed Media Cards
Do you re purpose your supplies for other things? I do! I wanted to create a project using supplies that I already on hand - Mixed Media Cards popped into my brain and there it stayed. I am not a huge mixed media crafter, but I do like to play around with it from time to time.  Almost all of the supplies are ones that I use on my scrapbook pages!

Each card is 10" tall by 4" wide and they are created using the Bo Bunny Genevieve paper line. I used stamps and stencils from Wendy Vecchi, crackle medium, dies, Gelatos, matboard, inks, sprays, and of course Stickles. Because no project is ever complete without Stickles!

Mixed Media Cards Gold Flowers

For this card I stamped my sentiment (from Wendy Vecchi) onto patterned paper and then used a Little B punch on it. For the flowers I used a new product I saw at CHA and was WOWED by it!!

Mixed Media Cards Nuvo
This product comes in Gold, Silver, and Copper and is amazingly easy to use. You apply Zig glue to your embellishment and let it air dry, then rub the Gilding Flakes onto the glue. BAM! You now have sparkle galore. I also used, Wendy Vecchi Texture paste, Petaloo flowers, StazOn ink, and Stickles
Mixed Media Cards Yellow Flowers


For this card I made the flowers by hand using a Sizzix die and inked them with VersaMagic Dew Drop ink. Notice the Maya Road centers - they are amazing! (you have to sing that last part). The background is made using Wendy Vecchi stamps and stencil. This time I inked directly onto the card through the stencil using VersaMagic Dew Drop in Hint of Pesto. Because this ink is opaque it will cover the pattern on the paper! I also used Sizzix Matboard to cut the silver swirl, DecoArt Crackle Paint and Metallic Lustere in Silver on the matboard, Dylusions spray ink in Lemon for the ribbon, Signo white pen to add accents
Mixed Media Cards Coral Flower


For the last card I made another flower using cardstock and punches, highlighting the edges with Copper Stickles. The small flowers tucked behind are from Petaloo.

Mixed Media Cards Stenciled LEaves
These leaves are made using the same stencil I used on card two, this time I used texture paste through the stencil and let it dry. I then colored it with Gelatos (Pistachio). I also used Wendy Vecchi stamps, Distress Stain, the butterfly is a die from Eileen Hull, chipboard from Blue Fern Studios
How can you repurpose supplies you already have to create something new? I would love to see - please leave me a link in the comments!
Signature1
List of art supplies:
  • DecoArt: Metallic Lustre (Radiant Red, Silver Spark), Media Line Fluid Acrylics (Multiple colors), Sand Texture Paste, Modeling Paste, Mat Medium, Crackle Glaze, 
  • Therm-o-web: Deco Foil (Hot Melt Adhesive, Pewter Transfer Sheets), SuperTAPE, Easy-Tear Tape, 3D Foam Squares, Sticky Dots), 
  • Sizzix: Dies (Paper Sculpting Daisy, Flourish, Butterfly Vine & Flowers), MatBoard
  • Wendy Vecchi: Stencils (From the Garden, Lovely Leaves), Stamps (Garden Art, Just Word Art, Ornate Dots, Dots and Dashes, Heirloom Art)