Showing posts with label Fairfield. Show all posts

DIY Dog Cape using Oly-Fun Metallic by Fairfield

Welcome to the Designer Crafts Connection Blog Hop sponsored by Fairfield World. There are so many fun and beautiful projects to be seen - so don't miss a single one. 


Say hello to Miss Eliza,, how cute is my puppy?? Yes, she is still a puppy. She is barely a year old and still has quite a bit of growing to do. We love to go walking, but I get super tired of everyone calling her a HE.
How old is HE?
Is HE going to get bigger?
How much does HE eat?
on, and on, and on,,,,,
Enter the Pink Super Dog Cape!  I am hoping that people will see the PINK and maybe, just maybe, notice that SHE is a GIRL :)

In case you are wondering, Miss Eliza is an Irish Wolfhound and is as sweet as can be. As I type this she is laying in my lap pushing my laptop to the side.
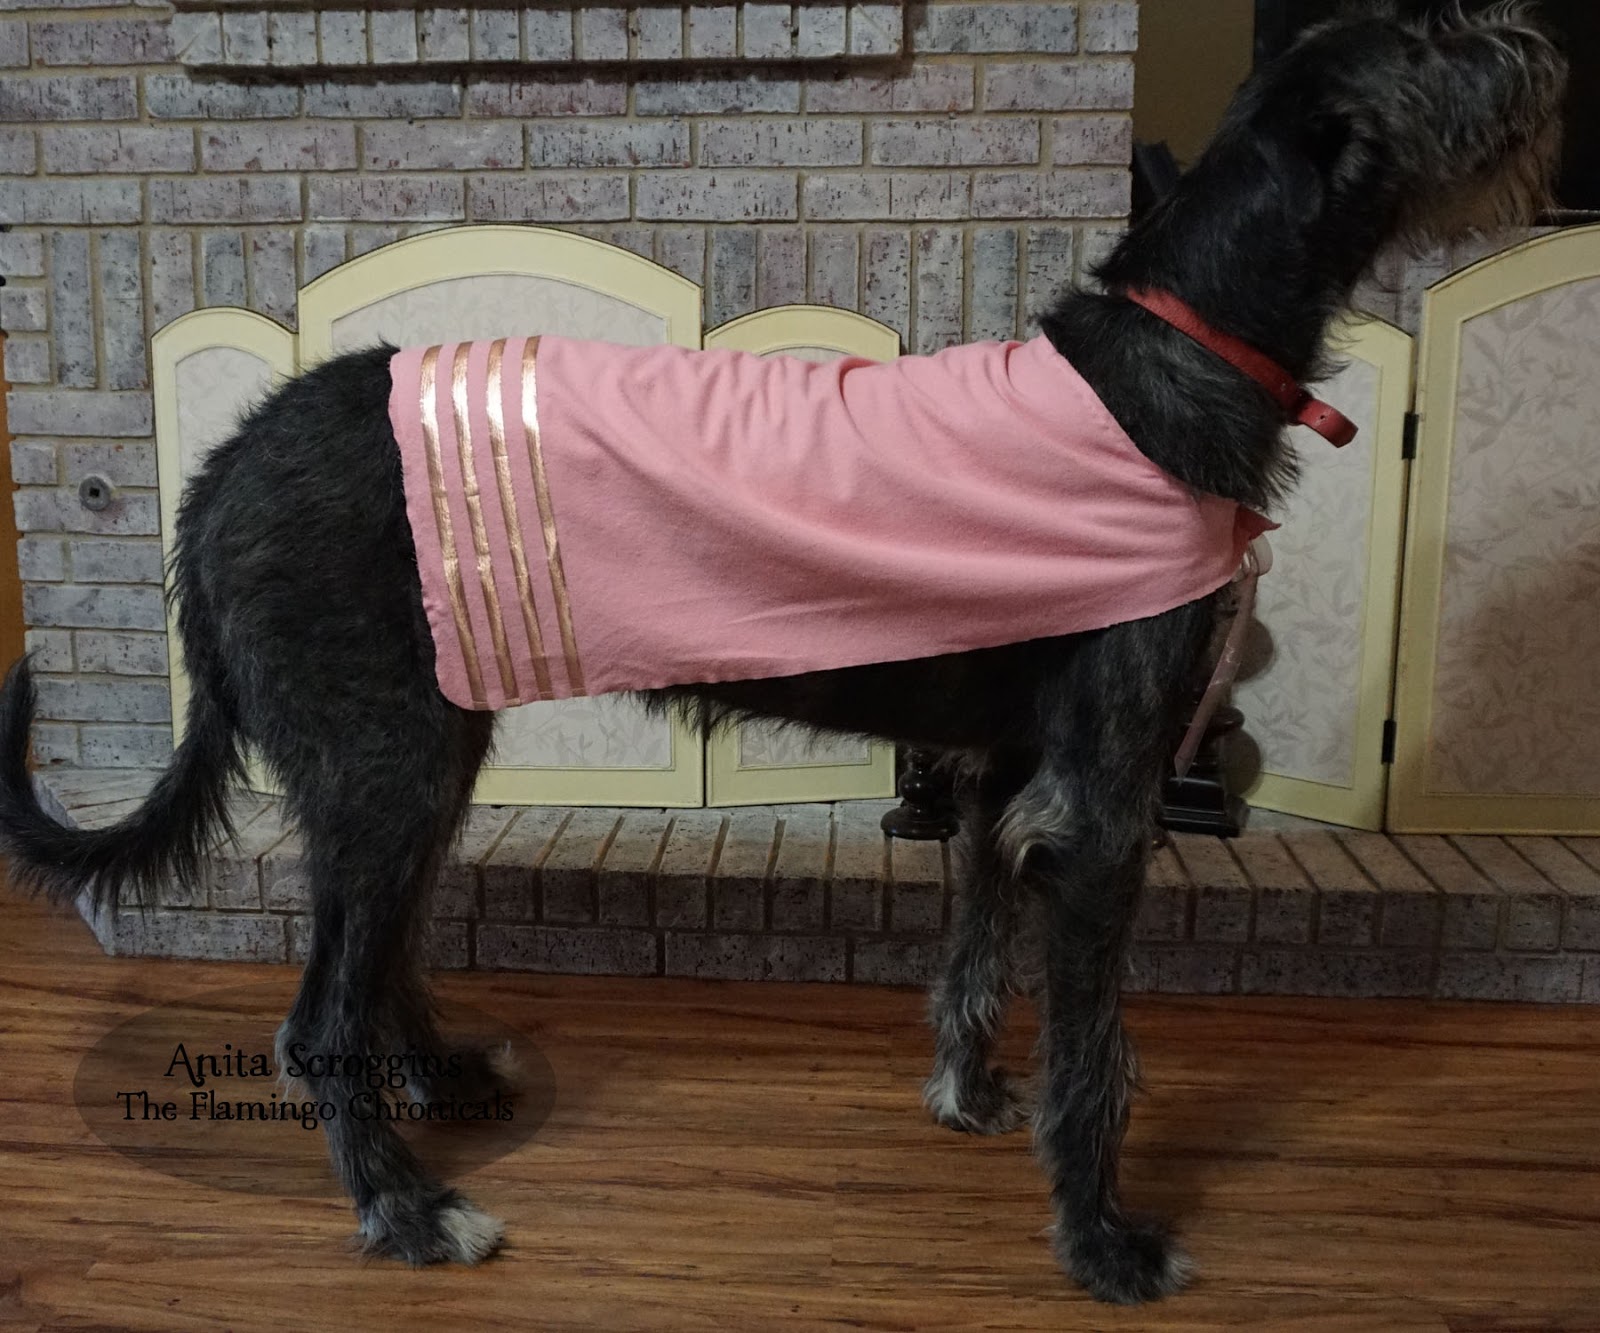
I adorn her Super Cape with Metallic Oly*Fun™ provided to me by Fairfield World. I am pretty impressed with the new metallic colors - they are so shiny! I used the Rose Gold for this project - it also comes in Gold, Silver, and Red.

There is a fabulous prize up for grabs!
Be sure to make it all the way to the bottom of the post.


I started by making a pattern with newsprint. This took a couple of tries. NOTE: the pattern only represents HALF of the finished project, the side at the bottom of the photo is placed on the fold of the fabric.
Then I measured her from the neck down her back as far as I wanted the cape to go; I decided on 28"long and 24" wide.

I cut 1/2" wide strips of the Rose Gold Oly*Fun™ and Stick Double Sided Fusible Interfacing (Not the Structure pictured, I decided that wasn't going to work as well as I wanted).


I applied 4 strips across the end of the cape. Ironing with a damp pressing cloth to seal the Oly*Fun™ to the flannel.  This was more tedious than it sounds.  I added a simple straight stitch all the way around the edges to finish it off, 


 I overlapped the flaps in the front, punched holes and threaded a ribbon through to tie a super cute bow. 
I don't know what I was thinking. I have to put the cape on her, then thread the ribbons through the front flaps to tie the bow. The entire time that is taking place she is either
  • licking my head
  • chewing on me hair
  • trying to eat the bow
  • or just wiggling around in general
That is not going to work, so I am going to have to rework it before we go out in public!


Prizes? Who is interested in winning a prize?

Be sure to head back over to the Designer Crafts Connection Blog to find out all the details on how you can win a bolt of Metallic Oly*Fun™.


Bunny Ear Baby Teethers using Fusi-Boo

Howdy everyone in blog land. Spring has sprung and I am super happy about that! Of course, in Texas that means bluebonnet photos and here is my Princess in her first set of photos

Seriously - how cute is that face! "Mimi- what do you mean I can't eat it?"

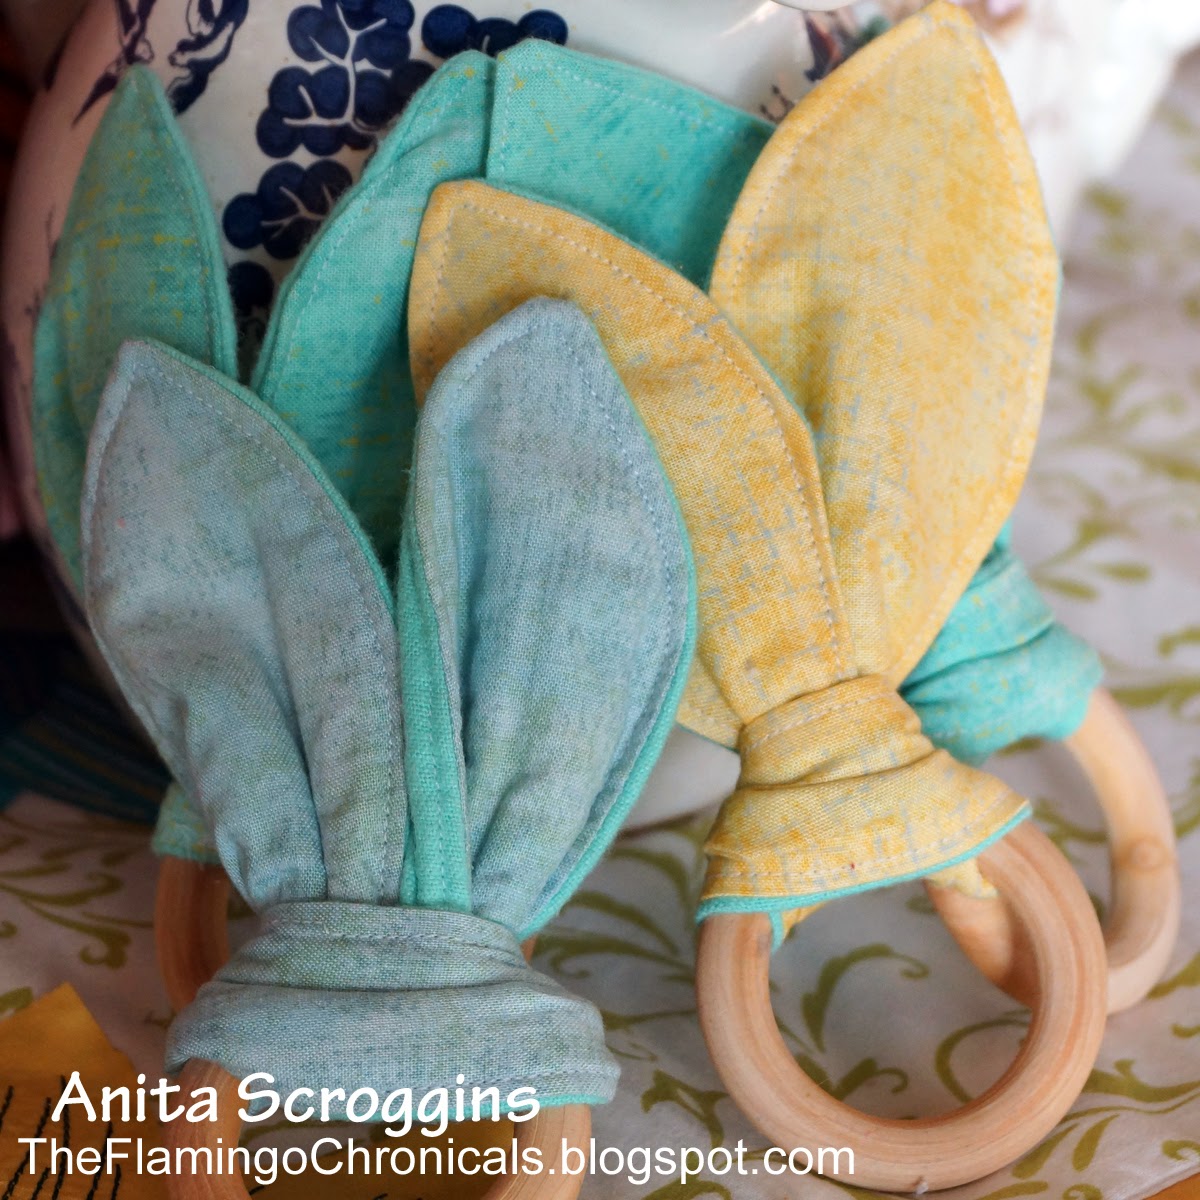
Of course, the Princess is putting everything in her mouth these days since she is teething, so I needed something for her to chew on.  I got out some beautiful fabric from ADORNit and my Fusi-Boo from Fairfield World and went to work. Here is what I came up with (thank you Pinterest!)

These were so easy and quick- if you can sew a straight stitch you can make these.


I love these fabrics! I have used Burnish Mustard, Burnish Aqua, Burnish Grey, Burnish Green, Burnish Pink, and Red Burnish. You can find them all here.

First thing is to cut your fabric and Fusi-Boo into strips about 4" wide X 14" long. You will need:
  • cotton print fabric for the front
  • a flannel or minky fabric for the back
  • Fusi-Boo for the middle
I made 10 of these in just over an hour. By working on each step 10 times, before going on to the next step, it really speeds up the process!

I drew a pattern on 8 1/2 X 14 paper and cut it out. Be sure to add your 1/4" seam allowance to the pattern. Place your fabrics right sides together, and add a layer of Fusi-Boo, then pin the pattern on and cut out.

Stitch around the fabric, leaving one side of the middle portion open. Snip the ends to cut down on bulk and turn inside out. Press the seams flat, making sure to turn the open section under 1/4". 

Top stitch all the way around the fabric very close to the edge and press again. I used a Lark's Head Knot to tie them on my wooden rings (ordered from Amazon). She loves these things! The best part is, when they are soaked in drool you can take the fabric off, throw it in the washer, and put it back on the ring. Super handy.

Be sure to check out ADORNit for beautiful fabrics and Fairfield World for Fusi-Boo.

What have you been working on lately, please share a link with me in the comments! I would love to see.

Thanks so much for stopping by today! Have an amazing weekend!

Handmade Holiday with Fairfield World Fusiboo

This month I had the opportunity to work with some wonderful materials from Fairfield World Inc. I wanted to try the Fusi-boo Fusible Blended Fiber Batting.  I HATE pinning when I am working with batting so I figured this would be perfect stuff!

I had some super cute little quilted tags I wanted to make for this upcoming Christmas season, so I figured it was the perfect time to give it a try.

 I have had this fabric for a while and I wanted to use it in my Christmas decor this year. I also wanted to have some very cute hand made gift tags for the goodie bags I give out every year. These were SOOO quick to make y'all!

I used minimal supplies- Fusi-boo, my fabric and some plain canvas for backing, scissors and a waterproof pen.

I started by fusing my fabrics together by following the directions on the Fusi-boo package. I made a template, traced it on the fabric and cut out with my pinking shears.

Cute, yes? Next up I stitched them together using a plain straight stitch around the edges to secure.

I added a hanging loop and a bow at the top.

I used a waterproof pen to add my message to the back. I'll also add names when I get ready to use them. For the moment, I have them hanging on my centerpiece- just looking pretty!

Fairfield World has some AMAZING products, I am having so much fun playing with them. If you have not checked them out lately, you are going to want to see what they have to offer for yourself.

Our Social Sites
https://www.facebook.com/FairfieldWorld
http://fairfieldworld.com/blog
http://www.pinterest.com/fairfieldworld/
http://instagram.com/fairfieldworld


Of course we have a great prize up for grabs, so be sure to enter for your chance to win!

a Rafflecopter giveaway


Thank you so much for stopping by my blog today- I hope you have a wonderful weekend and do some fun crafting!

Anita


Creative Costumes with Oly*Fun

Hi everyone! Today I have a fun project to share with you. 
I was given the opportunity to create with oly*fun from Fairfield World  and it is super easy
 to work with I must say! I have included some information on it at the bottom of my post, so be sure to check out all the fun things you can do with it!

Our theme is Creative Costumes so of course I wanted to make something cute for our new grand daughter. Did I mention how amazingly cute she is???

Anyway, when I saw the colors I thought of flowers, and my daughter wanted something with sun flowers. Since sweet Skylar is not big enough to actually Trick-or-Treat this year, she will just be hanging out looking cute in her costume.

I started with a cute onsie to match the theme. To make the ruffle of petals around the neck, I drew two petal patterns on paper and cut them out using Snow White and Lemondrop. I stitched two layers of Lemondrop petals on the neckline, overlapping the petals, then added the Snow White petals on top.  I added detail to the petals using my Tombow markers.


I used Fabri-Tac to adhere a cute brown ruffle ribbon from my stash, and sewed a trio of buttons on to complete the flower neckline.

For the stem, I folded Kiwi to form a three layer thickness and basted down each side. I folded in thirds again, and whip stitched the edge closed on the back side. I used a simple running stitch to attach it to the garment and added some fun ric-rak on top using Fabri-Tac. 
For the leaves I die cut the fabric using a Tim Holtz die. 

See, cuteness overload!

Be sure to check out all the creations over on the Fairfield Blog  
Polyfil can be found in most major craft, hobby and big box retail stores.
Oly-fun is available from Hancock Fabric, Fabric.com and though http://shop.fairfieldworld.com/c/oly-fun and various other sites.

Our Social Sites
https://www.facebook.com/FairfieldWorld
http://fairfieldworld.com/blog
http://www.pinterest.com/fairfieldworld/
http://instagram.com/fairfieldworld


Thank you so much for stopping by!
Have a wonderful weekend

Anita


Introducing Oly*Fun – “The everything material”

This is one of the the easiest, most versatile materials you will ever find.You can sew it, glue it, staple it, pin it or tie it
You can write on it, paint it, embellish it, stamp it or stencil it
You can scissor, rotary, or die cut it
You can use it as fabric or use it as paper
You can use it indoors and outdoors
The only thing it won’t do is fray, tear, or fade so don’t bother hemming it.

SOLID COLOR THROUGHOUT Use both the front and back - no white core or back side 
GREAT VALUE A good value solution for holiday and event decorating, costumes, kids projects and activities NO FRAYING Easy sew, no hemming required WATER RESISTANT Ideal for a wide variety of indoor and outdoor uses
Project and Content Creation Ideas:
Works inside and out and is very economical, so it’s a great alternative for PARTY CRAFTING – and canbe used instead of paper or tissue for many projects. It’s more durable than papers – wont crease,wrinkle or tear quickly in wind or from hyper kids - and it won’t disintegrate when in contact with water.CREATIVE GIFT WRAPPING – To sew or not to sew – that is your question – use basic folding and wrapping techniques or more complicated origami to create beautiful, unique and durable gift wrapping.Vibrant colors can be used as is, or can be stamped, stenciled, or painted on with a variety of materials.If you can make it in Felt, you can make it in Oly*Fun – but it will be more weather and water resistant with a more tailored look and feel.
Easy to die cut for Bulletin Board art, school projects, and all sorts of teacher / student projects.


Easy to sew – this is a great material for beginner sewing – there is no grain, no selvedge, no sizing, no fraying.... Just so easy.
Essentially all school spirit color combinations are included in the 18 color palette of Oly*Fun – make spirit pom-poms, spirit cuff bracelets, bleacher cushions, ponchos, etc for your students and community.Can make a great fundraiser – easy to make by kids and families – reasonable cost and lots of value when sold before a big game!

What exactly IS oly*fun? oly*fun is a specially engineered material that features some of the best things about fabrics AND papers.
How do I sew it? Very easily! There is no grain to oly*fun, so you can cut it any which way you want.There is no need to pre-wash, as there is no sizing or shrinkage. Use a simple stitch to attach pieces together, and hem only if you want. oly*fun will not fray.
Do I need to pre-wash it? There is no sizing in oly*fun, so there is no need to prewash.
When it needs cleaning, how should I wash it? It’s best to wash on gentle cycle and air dry.
Can I iron it? Yes, but carefully. Use only a cool or low iron with a pressing cloth.
Can I use it outside? Absolutely! oly*fun is weather resistant –so water rolls right off.
Can I glue it? Yes! oly*fun glues best with Fabric Glue such as FabricTac or Aleene’s Tacky Glue. A hot Glue gun works great too. It’s best to test the glues before kicking off a big project.
Can I die cut it? Yes! oly-*fun runs through any pressure style die cutters like Sizzix, or Accu-cut. It will work with a digital die cutter if a stabilizer is used.
What other ways can I cut it? Use scissors, rotary cutters or paper cutters with a rotary style blade.It’s best to test before kicking off a big project.
Is it flammable? No. oly*fun is not flammable, it will melt if exposed to flame.
How is oly*fun sold? oly*fun is sold on bolts and in quick grab and go packages. The bolted material is60 inches wide and can be cut to whatever length you like. The grab and go package is 20 inches wide and includes 3 yards of material.
How many colors does it come in? oly*fun comes in a rainbow of 18 vibrant solid colors. The colors can be mixed and matched to create projects for any holiday or season, and almost any sports team or school!