Showing posts with label Joy Iron on letters. Show all posts

Reindeer Snacks Table Sign

Reindeer Snacks
Who else is working on their last minute crafts? I know I have a few more things to get done! This year in addition to cookies for Santa we are leaving our Reindeer Snacks- so I made this super cute table sign for the princess to put out as well.

Stencil and paste
I started by covering a wood sign blank with patterned paper and sanding the edges to fit. I added some texture with a snowflake stencil and modeling paste, then set it aside to dry.

Iron on letters

 I pulled out some red Joy® Iron on Embroidered Letters - these are a 1" size. I love this size for smaller projects- they are so versatile!

Christmas snacks

The small Christmas tree is made using an older Sizzix die and matboard. I inked it with two colors and added a bit of texture paste for snow. Embellishments are from my Christmas box - lots of older buttons and tiny bits to finish the piece off.

I hope you have a Merry Christmas this year! Thanks so much for stopping by to see what I am up to.


DIY Crafty Apron

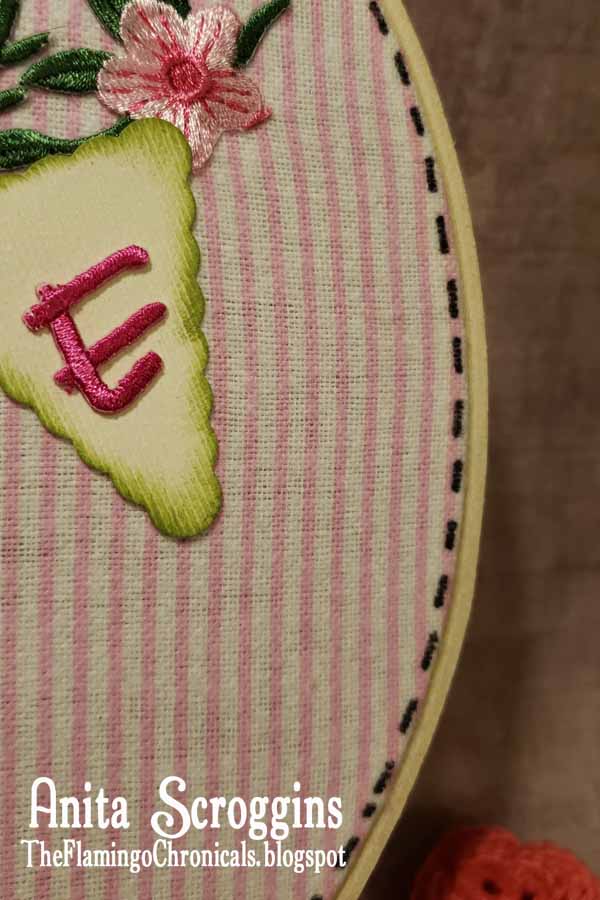
Are you like me and have several aprons from different companies? I love my aprons and wear them often. I like to decorate them too - just to give them that little bit of extra flair!  For this DIY Crafty Apron I used Joy® Iron on Embroidered Letters and my apron from Deflecto®. Super easy!

Irish Wolfhound Crafty
Yep - that's my hound! She cracks me up. I was having a hard time getting a good shot of the apron so I decided to have her model it. That just made it harder to get a good shot!!  In case you are wondering she is an Irish Wolfhound, she is just over 4 years old, and she weighs in at about 175lbs. She is a big girl! We also have a Wolfhound Puppy right now too - it's crazy at our house!

This post may contain affiliate links. Please see my full disclosure*

DIY Apron

This project is so simple and you probably have everything you need to make one!
  • Joy® Iron-on Embroidered Letters
  • Joy® Iron-on embroidered appliques
  • Apron that you have laying around
  • Iron
  • Ironing pad
That's it!

Iron on letters

I use an ironing pad when I am crafting. It is so much easier than using an ironing board. It folds up and goes in the closet when I don't need it. It is super light weight but it protects what ever surface I have it on. I have used it on my craft cabinets, my kitchen counters, and my good dining room table with no problems. I am using the same Black and Decker Iron that the hubs had when I met him 31 years ago. Yep - it is still working beautifully!

Follow the instructions found on the packaging to adhere your letters and floral applique. I cut my flowers into individual pieces instead of the spray.

Joy Iron on letters

I love this style of letters - they come in a variety of colors and they can be used on so many different projects. They are perfect for kid's projects.

Craft apron
 Look how cute it is! I can't wait until the next craft show or crop to show it off.

Irish wolfhound apron
Yes, we had out takes. Lots of out takes. Like 30 of them. This dog is crazy and she never stands still. I have literally hundreds of blurry photos of this dog.


4th of July Wall Decor

Create a fun piece of wall decor to celebrate the 4th of July!

This post may contain affiliate links. 

USA Decor
How fun is this? Do you love to change out your home decor pieces with every holiday like I do? I am always looking for fun new pieces to put out each month. Creating this one was fun and fairly quick. Please see the bottom of the post for the supplies I used.

Base Coating wood
I started with a premade wood base from the local big box craft store. I used a base coat of Cottage White Pickling Wash by FolkArt. I was not concerned with getting a smooth coat of paint and really just brushed it on at will.

Modeling paste
Have you tried this stencil paste yet? I was able to try it back at Creativation in January and I LOVE it! It is so smooth and lightweight and drys super quick. It is really easy to spread over the stencil and I have not had it leak under the stencil at all. Give it a try, you will love it!

Using a stencil
After the paste was dry I used a dollar store make up sponge to very lightly brush paint across it. I love how much texture this gives a project!

Dragonfly Glaze
I used a piece of chipboard from the {a vintage girl} line and base coated it with light gray paint. I lightly sponged on a brown paint randomly and then added a splotches of the new Dragonfly Glaze from Plaid. This stuff is awesome y'all. It is a color shifting glitter that you can add on top of other paints. 

Embroidered letters
See that sparkle at the top of the chipboard piece? That's the Dragonfly Glaze!  I added the chipboard to the base using a low temp glue gun, then added my Joy® Iron on Embroidered Letters. The letters are SELF STICK y'all so they are easy to use in craft projects like this one. 

I used a 3D Foam Star from Scrapbook Adhesives by 3L and coated one side with a bright blue glitter. I removed the backing from the other side and added it to my ribbon. 

Plaid Craft Paints

I used the following supplies on this project:


Create a Happy Banner

This post may contain affiliate links.


I am really trying to up my happy these days and I want to remind myself to BE happy. I created this fun banner using supplies from Joy Iron on Embroidered Letters, Kunin Felt, and Plaid Crafts.


Start by tracing the banner pattern onto your felt. I like using a Tombow Fudenosuke Brush Pen. It glides easily over the bumpy felt and leaves a nice line to cut by.


I cut two layers using the same pattern. I cut the bottom layer using straight line scissors (I love my Ginger ones!). The top layer was cut using pinking shears, but I cut inside the line for this one. When they are layered together it allows just a tiny border of the bottom layer to show through. I used Alene's Max Tacky Glue for this project- it grabs quickly and holds while drying.


Have you tried the Fabric Creations paint line from Plaid yet? These paints are amazing on fabric. For this project I used a bright yellow for the base coat and let dry. Be sure to work the paint into the letters so no bare spots remain. I added a top coat of Fantasy Glitter which really pops up the sparkle!


Did you know that Joy Iron on Letters come with an adhesive backing? This is an amazing feature! It allows you to place the letters on your project and have the stay temporarily until you iron them on.

Use a low temp glue gun to add some cute pom pom trim to the bottoms of the banners. This one if from Expo International.

I made these adorable little tassels using the new Bucilla Tassle Maker. The set comes with three different sizes of tassel makers - this is the smallest size. I can't wait to try out the larger sizes.


How to Decorate with Embroidery Hoops

Hey y'all! I hope you are working on your Valentine decorating.  I have been all about the embroidery hoops lately- I have several projects in the works so be on the look out for those on the blog soon.  For this project I used an 8: hoop and supplies I had on hand.

I began by pressing my fabric, ironing the floral embroidery piece in place, and positioning the hoop on it.  Pay attention to the pattern on your fabric!!  Move the bottom of the hoop (shown here) under the fabric and secure the top of the hoop in place. If it matters to you, be sure you get the hardware on the hoop at the very top. Tighten the hoop down and pull the fabric tight.


Trim the fabric around the hoops leaving  a little over a half inch margin. Fold the fabric under and secure in place using Beacon 3-in-1 glue. This glue grabs the fabric and sets quickly.

I used my Monotwin from Tombow in black to add faux stitching all around the edge. I really have a thing for faux stitching - I add it to pretty much everything!

I used an older CTMH punch for the pennants, inking the edge of the cardstock with Tea Leaves Dew Drop from Tsukineko. I use my 1 1/2" Xyron Sticker maker to adhere the letters to the pennant pieces. The heart shaped piece is SELF STICK y'all! Add some flowers, leaves and ribbons to accent the bottom of the hoop.


How cute is that?? Love that faux stitching by the way 😁

To finish the project off I added more twine for a bow to cover the hardware.


 Supplies:
Thanks so much for stopping by today. I hope you give this fun craft a try.


DIY Stamped Thank you Treat Bags


This time of year I am always looking for ways to say thank you to family, friends, and associates. These stamped treat bags are the perfect way to say thank you to anyone you know.  They are quick and fun and even the little ones can get involved with this craft.


I started by stamping on pre made muslin bags. These little bags are so cute and you can pick them up at Hobby Lobby. They are about 4" x 5" and are the perfect size for holding small treats.  I used Fabric Creations paint and stamps - both by Plaid Crafts. These Fabric paints are designed just for fabric and are fast drying and opaque. They are available in a wide range of colors to suit any project.


 After the paint was dry I used ink and a small stamp to add the leaf accents around the flowers. To set the Fabric Creations be sure to let it dry over night and then heat set following the instructions on the bottle.

I colored my Joy Iron on Letters with a matching ink, then applied the letters following the directions on the package. They are super easy to iron on and they are permanent once applied!


My supplies are:

Fabric Creations soft fabric paint and Stamps from Plaid Crafts 
Pre made muslin bags
Joy Iron on Letters - Baby Monogram
Ranger Archival Ink
assorted stamps
Iron
Ironing pad


How to make a Disney Countown Jar with a Thrift Store Cookie Jar!

This post may contain affiliate links.

Disney countdown


We are taking our whole family to Walt Disney World this fall and I am SO excited y'all! I can't wait. I have been wanting a way to countdown the days with the princess AND store the gift cards we have been collecting and this vintage thrift store cookie jar fit the bill perfectly. And it was a buck! What a steal!

Vintage cookie jar
For this project I used the following supplies:
Cookie jar make over
 This project was a breeze to assemble.
  1. Paint the chipboard with the Plaid Chalkboard paint. You need two coats, dry between coats. Use the side of a piece of chalk to rub all over the chalkboard then wipe it clean. This "conditions" the chalkboard so that it is east to clean after each use. Set aside.
  2. Trace the jar onto the patterned paper and trim to fit. Mine is slightly smaller than the jar front. 
  3. Use the low temp glue gun to adhere to letters to the strip of cardstock. Adhere the cardstock to the patterned paper using tape runner and trim to fit. Adhere additional letters below cardstock strip. 
  4. Adhere patterned paper to jar front using tape runner. 
  5. Trim daisy from bunch and adhere to chipboard with glue gun. Use glue gun to adhere chipboard to front of jar. Write message on chipboard using chalk. 
  6. Done! 
Embroidered flowers
 I decided at the last minute that my project needed these cute little daisy accents. I absolutely love this new line from Joy. Be sure to look for them in your favorite craft store next time you are shopping.

Hop over to the Joy Facebook page to see some amazing projects and pick up some inspiration for your next crafty adventure!


Dino Birthday Bash


This post contains affiliate links. If you click on a link and make a purchase I will receive a small commission at no extra expense to you. 


It's all about dinosaurs at my house right now. We have a grandchild's birthday coming up and what could be cuter than this dinosaur birthday banner? Because I have so many projects I want to complete before the big day, I took advantage of a few ready-made pieces to bring this banner together quickly - including Joy iron-on embroidered letters.


Supplies:

  • Joy Letters 
  • Chipboard banner set
  • Wood dinosaur and palm tree pieces
  • Coastal and Brushed Metal paints from Plaid Crafts
  • adhesives, ribbons, paintbrushes, hot glue gun/sticks


I painted each chipboard piece in the background color, then added some gold highlights to each one. When dry, I used a white paint pen to add a few details.  You can certainly iron the letters onto the chipboard (I have done that before) but for the sake of speed, I used doubled-sided tape to attach the letters. Use hot glue to attach the wood pieces to the banner sections on the ends. Run a long ribbon through each of the chipboard pieces along with some smaller pieces of ribbon between each banner section. Done and ready to party!